Audi A4: Subframe, Removing and Installing
 Caution
This procedure contains mandatory replaceable parts. Refer to component overview and parts catalog prior to starting procedure.
Mandatory Replacement Parts
- Bolt - Bonded Rubber Bushing for Subframe to Body
- Bolt/Nut - Rear Final Drive to Subframe (AWD)
Removing
- Secure the subframe. Refer to → Chapter "Subframe, Securing".
- Remove the left and right rear brake caliper. Refer to → Brake System; Rep. Gr.46; Rear Brakes; Brake Caliper, Removing and Installing.
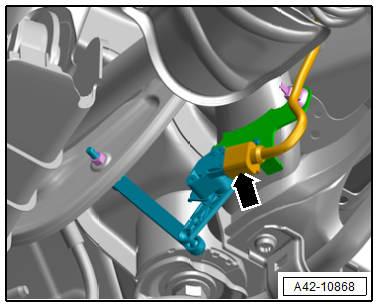
- Disconnect the left and right connector -arrow- from the rear level control system sensor and free up the wire.
FWD
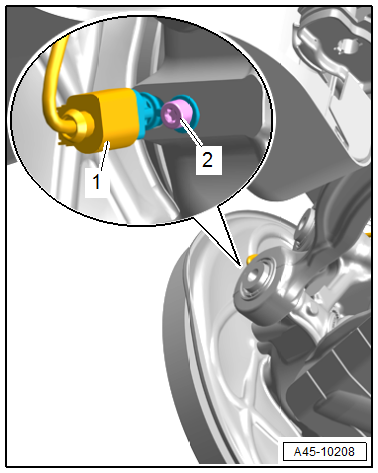
- Disconnect the left and right connector -2- for the speed sensor.
 Note
Note
Ignore item -1-.
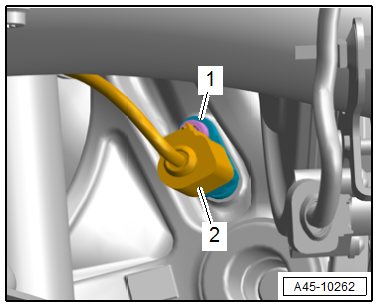
- Equipped on some models: disconnect the connector -1-.
- Remove the bolts -arrows- on the upper shock absorber fastener.
AWD
- Disconnect the left and right connector -1- for the speed sensor.
Note
Ignore item -2-.
- Remove the drive axle from the rear final drive and tie it up. Refer to → Rear Final Drive; Rep. Gr.39; Propshaft; Propshaft, Removing and Installing.
Continuation for All Versions
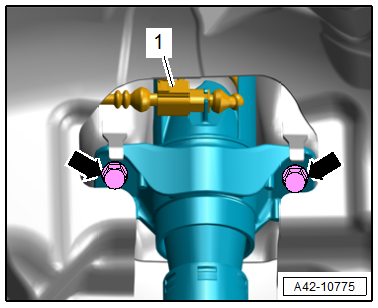
- Remove the left and right bolt -arrow- and free up the bracket -1- with the wires.
- Lower the subframe with the Engine and Gearbox Jack -VAS6931-.
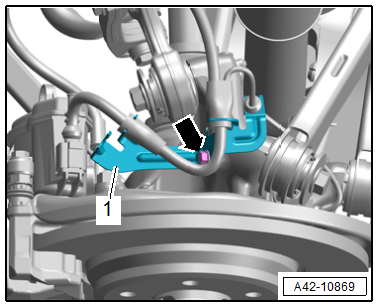
Note
Pay attention to the clearance to the surrounding components when lowering the subframe.
Installing
Install in reverse order of removal and note the following:
- Tighten the subframe bolts and tighten in a diagonal sequence without an additional turn.
 WARNING
Risk of accident!
If the vehicle will be driving on the streets, all bolts and nuts must be tightened properly according to the guidelines.
- A road test must be performed after completing repairs. If the steering wheel is crooked, the wheels must be aligned. Refer to → Chapter "Axle Alignment".
Tightening Specifications
- Refer to → Chapter "Overview - Subframe"
- Refer to → Chapter "Overview - Transverse Link"
- Refer to → Chapter "Overview - Wheel Bearing"
- Refer to → Chapter "Wheels and Tires"
Rear Bonded Rubber Bushing for Rear Final Drive, Removing and Installing
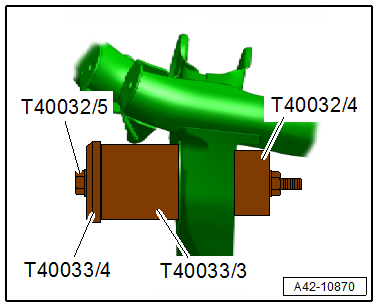
Special tools and workshop equipment required
- Puller - Differential Bearing -T40032-
- Rear Bushing Tool -T40033-
Removing
- AWD equipment version: Remove the rear final drive. Refer to → Rear Final Drive; Rep. Gr.39; Final Drive; Final Drive, Removing and Installing.
- Remove the subframe. Refer to → Chapter "Subframe, Removing and Installing".
- Mount the -T40032- and -T40033- on the bonded rubber bushing and on the subframe as shown.
- Remove the bonded rubber bushing from the subframe.
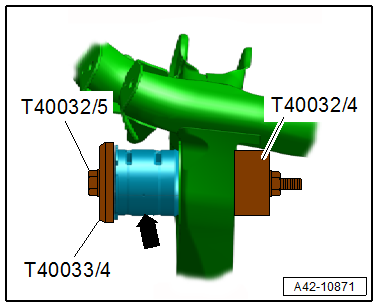
Installing
- Install the -T40032- and -T40033- on the bonded rubber bushing and on the subframe, as shown.
- Install the bonded rubber bushing all the way in the subframe.
Further installation is the reverse order of removal.
READ NEXT:
 Stabilizer Bar
Overview - Stabilizer Bar
1 - Bolt
25 Nm + 90Âş
Replace after removing
Tighten in the curb weight position. Refer to
→ Chapter "Wheel Bearing in Curb Weight Position, Lifting Ve
Overview - Transverse Link
Upper Transverse Link
1 - Wheel Bearing Housing
2 - Bolt
70 Nm + 180Âş
Replace after removing
3 - Front Upper Transverse Link
Removing and installing. Refer to
â†
SEE MORE:
Door Lock Cable, Removing and Installing
NOTICE
Risk of damaging the operating cable by deforming it.
- Never sharply bend or kink the operating cable.
Removing
- Remove the door window guide rail. Refer to
→ Chapter "Door Window Guide Rail, Removing and Installing".
- Remove the bolts -arrows-.
- Push t
Safety belts
General information
Each seat is equipped with a three-point safety
belt. Safety belts that are worn correctly are the
most effective way to reduce the risk of serious or
fatal injuries in a collision. Therefore, wear your
safety belt correctly and make sure that all vehicle
passengers are also wear
