Audi A4: Electronic Steering Column Lock Control Module -J764-, Removing and Installing
Special tools and workshop equipment required
- Torque Wrench 1783 - 2-10Nm -VAG1783-
Removing
- Remove the steering column from the instrument panel central tube and place in the driver footwell with the steering intermediate shaft attached. Refer to → Chapter "Steering Column, Removing and Installing".
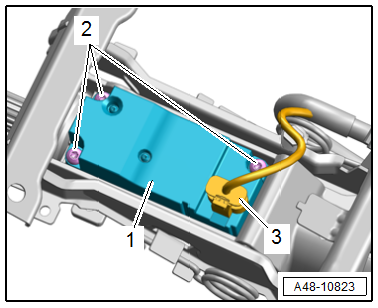
- Remove the bolts -2- and remove the Electronic Steering Column Lock Control Module -J764-.
 Note
Note
Ignore item -3-.
Installing
Install in reverse order of removal and note the following:
- Install the steering column. Refer to → Chapter "Steering Column, Removing and Installing".
- Calibrate the Steering Angle Sensor -G85-. Refer to → Chapter "Steering Angle Sensor -G85- Basic Setting".
Tightening Specifications
- Refer to → Chapter "Overview - Steering Column"
Steering Column, Disconnecting from Active Steering Actuator
Procedure
- Steering column is removed. Refer to → Chapter "Steering Column, Removing and Installing".
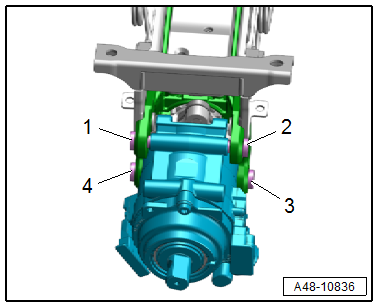
- Remove the pins -1 to 4- and carefully remove the steering column from the active steering actuator.
Note
Replace the pins and insulation components after removal.
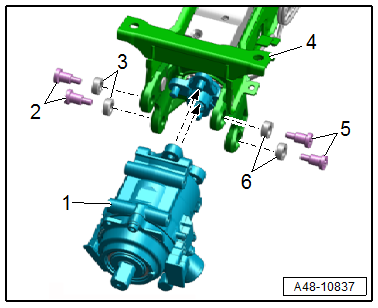
- Carefully bring the steering column -3- and the active steering actuator -1- together -arrows- without tilting.
- Insert the insulation components -4 and 6- into the steering column and screw in the bolts -2 and 5- all the way.
- Tighten the pins. Refer to → Fig. "Steering Column and Active Steering Actuator - Tightening Specification and Sequence".
READ NEXT:
 Overview - Steering Gear
Overview - Steering Gear
1 - Bolt
Replace after removing
Tightening specification -Item 2-
2 - Subframe Crossbrace
Overview. Refer to
→ Chapter "Overview - Subframe
Steering Gear, Removing and Installing
Special tools and workshop equipment required
Torque Wrench 1331 5-50Nm -VAG1331-
Torque Wrench 1332 40-200Nm -VAG1332-
Engine and Gearbox Jack -VAS6931-
Ball Joint Splitter -VAS251805-, not illu
SEE MORE:
Hinge, Resetting
To complete the procedure, a second technician is required to be at the
following position.
NOTICE
Risk of damaging the hood by opening when the pedestrian
protection is triggered.
- Only open the hood after the triggered pedestrian
protection has been reset.
- Use tape to pr
Rear Window, Removing and Installing
Undamaged Rear Window, Removing and Installing, Sedan
Special tools and workshop equipment
required
Cutting Tool for Bonded Windows -VAS6452-
Cutting Tool for Bonded Windows - Wire Reel -VAS6452/1-
Read the repair information. Refer to
→ Chapter "Repair Information"
Required tools and ma
