Audi A4: Front Seat Covers and Cushions
Overview - Seat Pan Cover and Cushion
Overview - Seat Pan Cover and Cushion, Seat without Seat Depth Adjuster
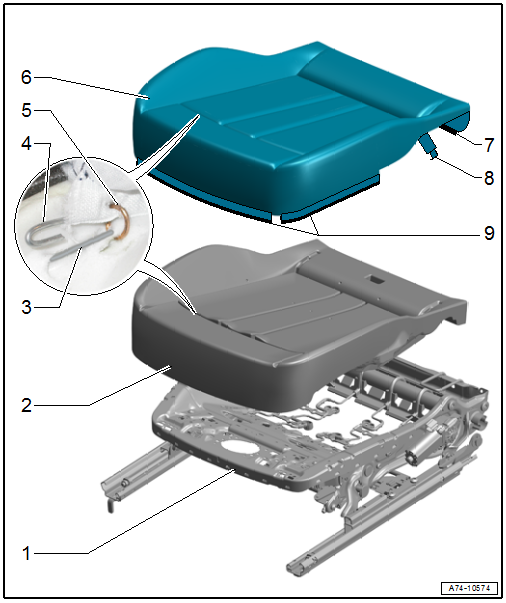
1 - Seat Pan
2 - Cushion
- Covers and cushions, removing and installing. Refer to → Chapter "Seat Pan Cover and Cushion, Removing and Installing".
- Cover and cushion, separating. Refer to → Chapter "Seat Pan Cover and Cushion, Separating".
3 - Wire
- Covered in foam padding
- For securing the cover to the cushion
4 - Contour Wire
- Pushed into the cover
5 - Upholstery Clip
- For securing the cover to the cushion
- Replace
- Install at the same location with Upholstery Clip Pliers -VAG1634-.
6 - Cover
- Covers and cushions, removing and installing. Refer to → Chapter "Seat Pan Cover and Cushion, Removing and Installing".
- Cover and cushion, separating. Refer to → Chapter "Seat Pan Cover and Cushion, Separating".
7 - Molding
- Sewn into cover
- For engaging the cover on the seat pan
8 - Hook
- For engaging the cover on the seat pan
9 - Molding
- Sewn into cover
- For engaging the cover on the seat pan
Overview - Seat Pan Cover and Cushion, Seat with Seat Depth Adjuster
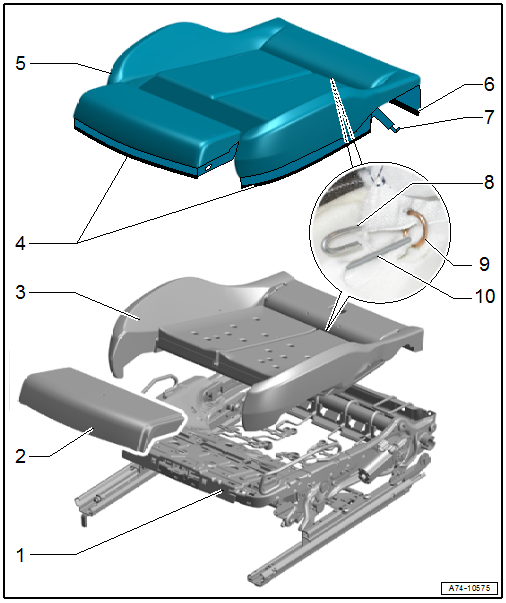
1 - Seat Pan
- With a seat depth adjuster
2 - Seat Depth Adjuster Cushion
- Removing and installing. Refer to → Chapter "Seat Pan Cover and Cushion, Separating".
3 - Cushion
- Covers and cushions, removing and installing. Refer to → Chapter "Seat Pan Cover and Cushion, Removing and Installing".
- Cover and cushion, separating. Refer to → Chapter "Seat Pan Cover and Cushion, Separating".
4 - Molding
- Sewn into cover
- For engaging the cover on the seat pan
- Check for proper seating
5 - Cover
- Covers and cushions, removing and installing. Refer to → Chapter "Seat Pan Cover and Cushion, Removing and Installing".
- Cover and cushion, separating. Refer to → Chapter "Seat Pan Cover and Cushion, Separating".
- Check that there are no folds after installing
6 - Molding
- Sewn into cover
- For engaging the cover on the seat pan
- Check for proper seating
7 - Hook
- For engaging the cover on the seat pan
8 - Contour Wire
- Pushed into the cover
- For securing the cover to the cushion
9 - Upholstery Clip
- For securing the cover to the cushion
- Replace after removing
- Install at the same location with Upholstery Clip Pliers -VAG1634-.
10 - Wire
- Covered in foam padding
- For securing the cover to the cushion
Overview - Backrest Cover and Cushion
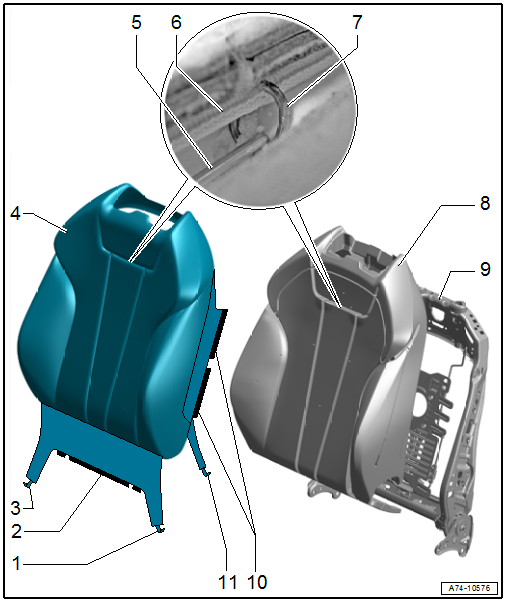
1 - Hook
- Sewn into cover
- For attaching the cover to the backrest frame
2 - Molding
- Sewn into cover
- For engaging the cover on the seat pan
- Check for proper seating
3 - Hook
- Sewn into cover
- For attaching the cover to the backrest frame
4 - Cover
- Covers and cushions, removing and installing. Refer to → Chapter "Backrest Cover and Cushion, Removing and Installing".
- Cover and cushion, separating. Refer to → Chapter "Backrest Cover and Cushion, Separating".
- Check that there are no folds after installing
5 - Wire
- Covered in foam padding
- For securing the cover to the cushion
6 - Contour Wire
- Pushed into the cover
- For securing the cover to the cushion
7 - Upholstery Clip
- For securing the cover to the cushion
- Replace after removing
- Install at the same location with Upholstery Clip Pliers -VAG1634-.
8 - Cushion
- Covers and cushions, removing and installing. Refer to → Chapter "Backrest Cover and Cushion, Removing and Installing".
- Cover and cushion, separating. Refer to → Chapter "Backrest Cover and Cushion, Separating".
9 - Backrest Frame
10 - Molding
- Sewn into cover
- For engaging the cover on the seat pan
- Check for proper seating
11 - Hook
- Sewn into cover
- For attaching the cover to the backrest frame
Overview - Seat Heating Element
 Note
Note
The Sport seat with the seat depth adjuster is shown.
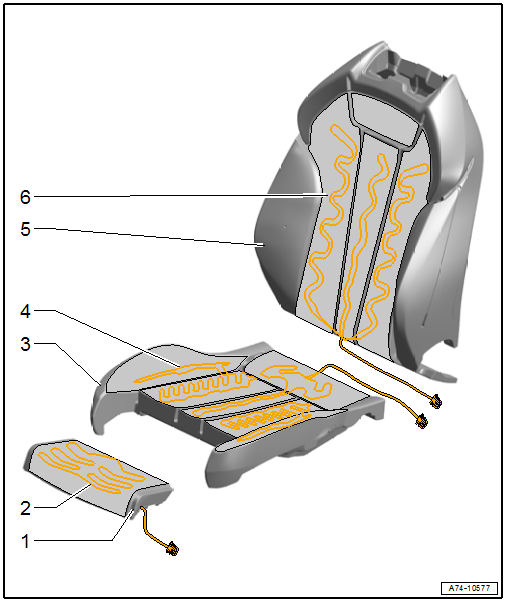
1 - Cushion
- For the seat depth adjustment
- Versions with seat heating: Attach a new heating element when replacing. Refer to → Chapter "Seat Heating Element, Removing and Installing, Seat Depth Adjuster".
2 - Seat Extension Heating Element
- Heated Driver Seat Extension -Z37-
- Heated Front Passenger Seat Extension -Z38-
- For versions with a seat depth adjuster
- Removing and installing. Refer to → Chapter "Seat Heating Element, Removing and Installing, Seat Depth Adjuster".
3 - Seat Cushion
- Versions with seat heating: attach a new heating element when replacing. Refer to → Chapter "Seat Heating Element, Removing and Installing, Seat Cushion".
4 - Seat Heating Element
- Driver Seat Heating Element -Z6-
- Front Passenger Seat Heating Element -Z8-
- Replacing. Refer to → Chapter "Seat Heating Element, Removing and Installing, Seat Cushion".
5 - Backrest Cushion
- Versions with seat heating: Attach a new heating element when replacing. Refer to → Chapter "Driver/Front Passenger Backrest Heating Element -Z7-/-Z9-, Removing and Installing".
6 - Backrest Heating Element
- Driver Backrest Heating Element -Z7-
- Front Passenger Backrest Heating Element -Z9-
- Replacing. Refer to → Chapter "Driver/Front Passenger Backrest Heating Element -Z7-/-Z9-, Removing and Installing".
READ NEXT:
 Seat Pan Cover and Cushion, Removing and Installing
Special tools and workshop equipment required
Backrest Panel Tool -3370-
Hook Tool -T40207-
Engine/Transmission Holder - Seat Repair Fixture -VAS6136-
Caution
This procedure contains man
Driver and Front Passenger Seat Heating Element -Z6-/-Z8-, Removing and
Installing
Seat Heating Element, Removing and Installing, Seat Cushion
Procedure
- Separate the cover and cushion. Refer to
→ Chapter "Seat Pan Cover and Cushion, Separating".
- Clip the wires
Rear Seat Covers and Cushions
Overview - Cover and Cushion
Overview - Cover and Cushion, Sport Bench Seat
1 - Seat Frame
With the molded piece
2 - Upholstery Clip
For securing the cover to the cushion
Re
SEE MORE:
About this Owner's Manual
In this manual, Audi provides important information,
tips, suggestions, and warnings for using
your vehicle. "Audi" refers to AUDI AG, the respective
importer in a country, as well as joint
ventures.
It has always been Audi's policy to continuously
improve its products. Audi reserves the right to
m
Repair Information
Minimum Curing Times for Bonded Windows
For safety reasons, use only non-conductive two-part adhesive
when installing windshield and rear window with the materials
listed below.
The vehicle can only be used after the minimum curing time has
elapsed.
During the minimum curing time, the vehicle mu
