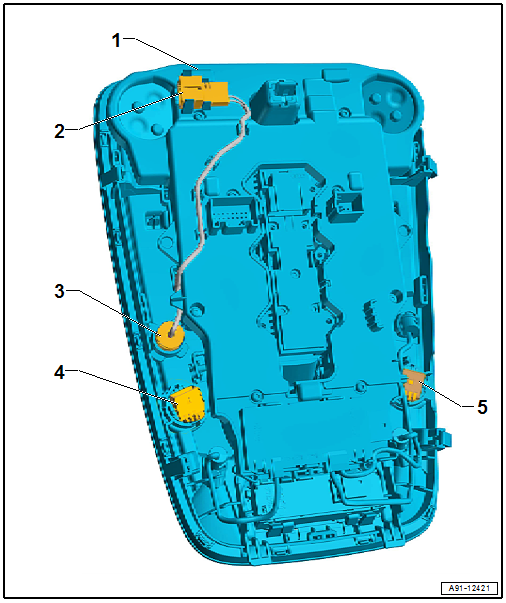
Audi A4: Microphone Unit in Front Roof Module -R164-, Removing and Installing
The Microphone Unit in Front Roof Module -R164- in the Front Interior Lamp -W1- is comprised of the Interior Microphone -R74-, the Left Front Microphone -R140- and the Right Front Microphone -R141-. The individual microphones can be replaced separately.
Removing
- Turn off the ignition and all electrical equipment and remove the ignition key.
- Remove the Front Interior Lamp -W1-. Refer to → Electrical Equipment; Rep. Gr.96; Controls; Component Location Overview - Controls in Roof Trim Panel.
- Unclip and disconnect the connector -2- and the connectors on the microphones -4 and 5- from the retainer in the Front Interior Lamp -W1--1-.
- Pry each microphone -3, 4 and 5- out of the Front Interior Lamp -W1--1-.
Installing
- Installation is identical in reverse order of removal.
Cellular Telephone Amplifier -R86-, Removing and Installing
The Cellular Telephone Amplifier -R86- is behind the right luggage compartment side trim panel.
Removing
- Turn off the ignition and all electrical equipment and remove the ignition key.
- Remove the right luggage compartment side trim panel. Refer to → Body Interior; Rep. Gr.70; Luggage Compartment Trim Panels; Luggage Compartment Side Trim Panel, Removing and Installing.
The Cellular Telephone Amplifier -R86--1- is locked into place in the bracket -2-.
It must first be removed with the bracket -2-.
- The connectors must be released and disconnected from the Cellular Telephone Amplifier -R86--1- and from the Parking Heater Radio Receiver -R64-.
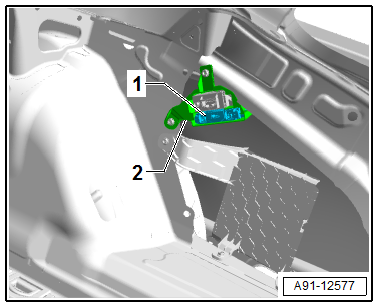
- Remove the nuts -arrows- from the bracket -2-, and remove the bracket.
- Remove the Cellular Telephone Amplifier -R86--1- from the bracket -2-.
Installing
- Install in reverse order of removal. Note the following:
Tightening Specifications
- Refer to → Chapter "Component Location Overview - Telephone System"
Telephone Baseplate -R126-, Removing and Installing
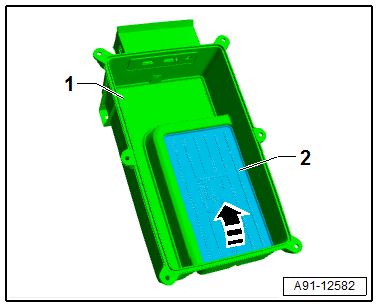
The Telephone Baseplate -R126- is located under the center console storage compartment.
Removing
- Turn off the ignition and all electrical equipment and remove the ignition key.
- Remove the center console. Refer to → Body Interior; Rep. Gr.68; Center Console; Center Console, Removing and Installing.
- Release and disconnect the connectors from the Telephone Baseplate -R126-.
 Note
Note
In the illustration the storage compartment is shown without the center console.
- Pry out the Telephone Baseplate -R126--2- in the direction of -arrow- out of the storage compartment.
Installing
- Installation is identical in reverse order of removal.
READ NEXT:
 Overview - Navigation System
Overview - Navigation System, MMI Navigation, 7UF
7UF - Navigation
Information Electronics Control Module 1 -J794- with
integrated CD player/SD memory card reader/navigation system in
the glove comp
Component Location Overview - Navigation System
1 - Bracket
2 - Bolt
3 Nm
Quantity: 2
3 - Information Electronics Control Module 1 -J794-
Connector assignment. Refer to
→ Wiring diagrams, Troublesho
SEE MORE:
Sliding/tilting sunroof
Operation
Applies to: vehicles with sliding/tilting sunroof
Fig. 40 Section of front headliner: sliding/tilting sunroof
button
The sunshade can be opened and closed manually
in any position when the roof is closed. The
sunshade opens automatically when the roof is
opened.
Tilting and closing the ro
Unlocking and locking the vehicle
Fig. 27 Door handle: sensor for locking
Depending on the vehicle equipment, you may
have various options for unlocking and locking
your vehicle. The settings in the MMI specify
which doors will unlock.
Unlocking or locking using the vehicle key
buttons
To unlock the vehicle, press the
button, f
