Audi A4: Multimedia System Control Head -E380-, Removing and Installing
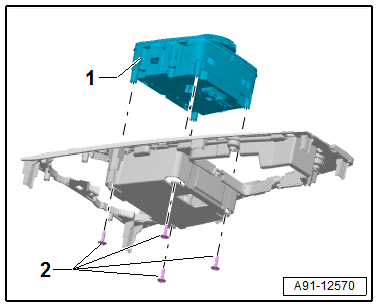
Multimedia System Control Head -E380-, Removing and Installing, Manual Transmission
The Multimedia System Control Head -E380- is located in the center console.
Removing
- Turn off the ignition and all electrical equipment and remove the ignition key.
 Caution
The surfaces can get scratched very easily. Carefully tape off all surfaces and sections!
- Remove the center console insert trim. Refer to → Body Interior; Rep. Gr.68; Center Console; Overview - Center Console.
- Remove the bolts -2- and the Multimedia System Control Head -E380--1- upward from the center console insert.
Installing
- Install in reverse order of removal. Note the following:
Tightening Specifications
- Refer to → Chapter "Component Location Overview - Infotainment System"
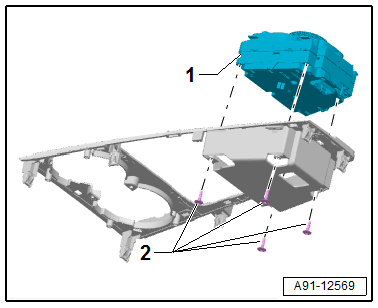
Multimedia System Control Head -E380-, Removing and Installing, Automatic Transmission
The Multimedia System Control Head -E380- is located in the center console.
Removing
- Turn off the ignition and all electrical equipment and remove the ignition key.
Caution
The surfaces can get scratched very easily. Carefully tape off all surfaces and sections!
- Remove the center console insert trim. Refer to → Body Interior; Rep. Gr.68; Center Console; Overview - Center Console.
- Remove the bolts -2- and the Multimedia System Control Head -E380--1- upward from the center console insert.
Installing
- Install in reverse order of removal. Note the following:
Tightening Specifications
- Refer to → Chapter "Component Location Overview - Infotainment System"
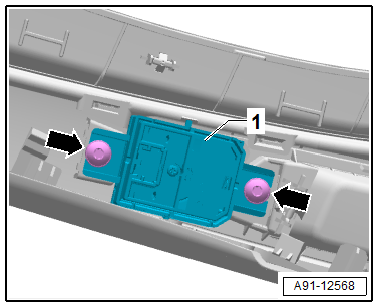
Driver Volume Control - E67-, Removing and Installing
The Driver Volume Control -E67- is installed in the center console insert.
Removing
- Turn off the ignition and all electrical equipment and remove the ignition key.
- Remove the decorative trim. Refer to → Body Interior; Rep. Gr.68; Center Console; Overview - Center Console.
The Driver Volume Control -E67- is attached to the decorative trim.
- Remove the bolts -arrows- and then remove the Driver Volume Control -E67--1- from the decorative trim.
Installing
- Install in reverse order of removal. Note the following:
Tightening Specifications
- Refer to → Chapter "Component Location Overview - Infotainment System"
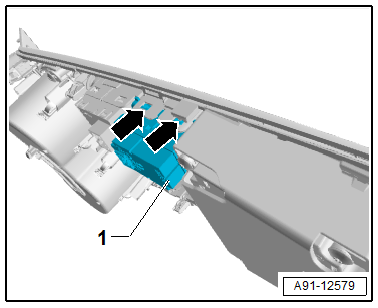
Multimedia Button Module -E817-, Removing and Installing
For manual transmissions, the Multimedia Button Module -E817- is installed in the center console insert.
Removing
- Turn off the ignition and all electrical equipment and remove the ignition key.
- Remove the center console insert. Refer to → Body Interior; Rep. Gr.68; Center Console; Center Console Insert, Removing and Installing.
The Multimedia Button Module -E817- is clipped in with the center console insert trim (quantity 4).
- Unclip the Multimedia Button Module -E817--1--arrows- and push downward out of the center console insert trim.
Installing
- Installation is identical in reverse order of removal.
READ NEXT:
 Overview - Sound System
The following systems are offered:
8RM - Basic sound system.
9VD - Standard sound system.
9VS - Premium sound system, Bang & Olufsen.
8RM - Basic Sound System
One speaker in
Component Location Overview - Sound System
Component Location Overview - Sound System, Speaker, Sedan
1 - Left Front Treble Speaker -R20-/Right Front Treble Speaker -R22-,
8RM, 9VD
- Left Front Midrange Speaker 2
SEE MORE:
Sliding/tilting sunroof
Operation
Applies to: vehicles with sliding/tilting sunroof
Fig. 40 Section of front headliner: sliding/tilting sunroof
button
The sunshade can be opened and closed manually
in any position when the roof is closed. The
sunshade opens automatically when the roof is
opened.
Tilting and closing the ro
Sill Panel Trim, Removing and Installing
Special tools and workshop equipment
required
Roller -3356-
Trim Removal Wedge -3409-
Wiring Harness Repair Set - Hot Air Blower -VAS1978/14A-
Cleaning Solution -D 009 401 04-
Applicator -D 009 500 25-
Bonding Agent -D 355 205 A2-
CAUTION
This procedure contains mandatory replaceable par
