Audi A4: Need for Axle Alignment, Evaluating
A wheel alignment is necessary if:
- Vehicle shows handling problems.
- Involved in an accident.
- If axle components were removed and installed or replaced.
- Tire wear patterns are uneven.
After REMOVING and REINSTALLING components.
.png)
- 1) When the subframe crossbrace was secured with the locating pins.
- 2) Even if the subframe was secured with the locating pins, an axle alignment may be necessary. Perform a road test.
- 3) Even if the subframe was secured with the locating pins, an axle alignment may be necessary. Perform a road test.
After REPLACING components
.png)
- 1) Even if the subframe was secured with the locating pins, an axle alignment may be necessary. Perform a road test.
Axle Alignment Procedure
 Note
Note
Determine the correct suspension version. Refer to → Chapter "Production Control Number (PR Number) Explanations".
- A vehicle with coil springs can only be measured at curb weight position. Refer to → Chapter "Vehicles with Coil Springs, Checking the Curb Weight Position for Axle Alignment".
The following sequence of procedure steps must be observed.
1 - Perform wheel run-out compensation. Refer to → Chapter "Wheel Run-Out Compensation".
2 - Check the maximum steering angle. Refer to → Chapter "Maximum Steering Angle, Checking".
3 - Check the rear axle camber and adjust if necessary. Refer to → Chapter "Rear Axle Camber, Adjusting".
4 - Check rear axle toe and adjust if necessary. Refer to → Chapter "Rear Axle Toe, Adjusting".
5 - Check front axle camber and adjust if necessary. Refer to → Chapter "Front Axle Camber, Centering".
6 - Check the front axle toe and adjust if necessary. Refer to → Chapter "Front Axle Toe, Adjusting".
When the adjustment on the suspension is changed:
- Calibrate the Steering Angle Sensor -G85-. Refer to → Chapter "Steering Angle Sensor -G85- Basic Setting".
- Adjust the headlamps. Refer to → Electrical Equipment; Rep. Gr.94; Headlamps; Headlamps, Adjusting.
If the adjustment on the rear axle was changed:
- Adjust the adaptive cruise control. Refer to → Chapter "Adaptive Cruise Control (ACC), Adjusting".
- Driver Assistance Systems Front Camera, Calibrating. Refer to → Chapter "Driver Assistance Systems Front Camera, Calibrating".
- Calibrate the rearview camera system. Refer to → Communication; Rep. Gr.91; Rearview Camera System; Rearview Camera System, Calibrating.
Production Control Number (PR Number) Explanations
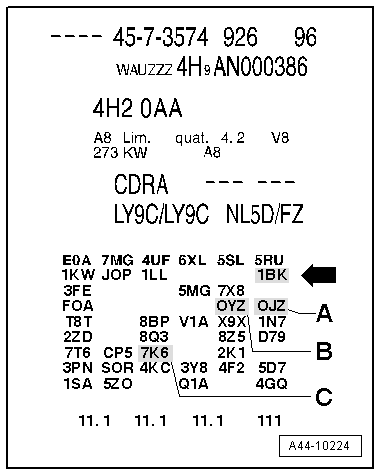
Vehicle Data Label
The PR number on the vehicle data label indicates which suspension is equipped.
Example of a vehicle data label:
- 1BK -arrow- = chassis PR number
Note
Component location in the vehicle data label.
ELSA/Vehicle-Specific Notes
The relevant information regarding the suspension, spring/shock absorber combinations and the driver assistance systems are in ELSA in the Specific Vehicle Information in the "Vehicle Data" document.
Wheel Run-Out Compensation
A correct toe-in adjustment will not be possible without performing lateral run-out compensation!
The lateral run-out of the wheel must be balanced (compensated for). Otherwise, the measurement result will be false.
The permitted axial run-out of the rims can exceed the specified toe setting tolerance. If compensation for wheel run-out is not performed, it will not be possible to obtain a correct toe-in adjustment.
Follow the operating instructions provided by the manufacturer of the alignment equipment.
Equipped on models with 7-speed dual-clutch transmission or 8-speed automatic transmission. For this reason pay attention to the following for the wheel run-out compensation: If the engine is switched off in the N selector lever position, the transmission remains in N for approximately 30 minutes and then automatically engages in P. As soon as the driver door is opened, P is directly engaged. Refer to the operating instructions in the Owner's Manual.
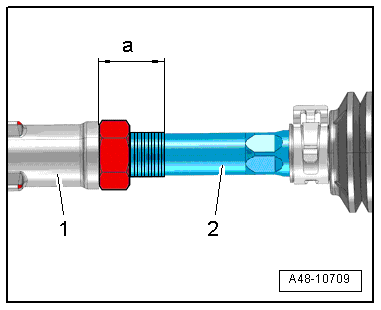
Maximum Steering Angle, Checking
The wheel alignment computer determines the maximum steering angle.
- If the maximum steering angle was determined on the alignment tester and the value is not within the tolerance, then check for damage or deformations to the steering and suspension components and evaluate the tie rod symmetry. In this case, shorten the "longer" tie rod end (install it deeper into the tie rod) and replace any damaged components.
- If a crooked steering wheel position was determined on the alignment equipment when setting the center position of the steering, then check the steering and suspension components for damage or deformations and replace any damaged components. Check the tie rod symmetry as well.
- Measure dimension -a- on the "shorter" tie rod head. Shorten the "longer" tie rod head to the same dimension. To do this, install the tie rod head -1- deeper on the tie rod -2-.
- Specified value: Dimension -a- right tie rod end = dimension -a- left tie rod end.
- The maximum permitted difference between the right and left is less than 2.5 mm.
- When returning the steering to its center position, let the steering wheel "come to its center" using even movements.
READ NEXT:
 Vehicles with Coil Springs, Checking the Curb Weight Position for Axle
Alignment
Vehicles with Coil Springs, Checking the Curb Weight Position for Axle
Alignment
The curb weight position must be checked before beginning an
axle alignment on vehicles with coil springs. Explanation of the
curb weight position.
Determine the Dimension -a-
- Determine dimen
Rear Axle Camber, Adjusting
Caution
This procedure contains mandatory replaceable parts.
Refer to component overview and parts catalog prior to
starting procedure.
Mandatory Replacement Parts
Nut - for Adjusting Bol
Front Axle Camber, Centering
Note
Camber cannot be adjusted.
Camber can be centered evenly within specified tolerance
range by shifting subframe.
Procedure
- Remove the noise insulation. Refer to
→ Body
SEE MORE:
Overview - Wheel Bearing
Overview - Wheel Bearing, FWD
1 - Wheel Bearing Unit
Removing and installing. Refer to
→ Chapter "Wheel Bearing Unit, Removing and Installing, FWD".
Handling the wheel bearing. Refer to
→ Fig. "Wheel Bearing, Handling".
2 - Front Seal
3 - Wheel Bear
Using the telephone
Accessing the telephone functions
Applies to: vehicles with telephone
Fig. 136 Center display: selection menu
Requirement: a mobile device must be connected
to the MMI.
Applies to: MMI: Select on the home screen:
PHONE.
Possible telephone functions:
Search
Call list
Favorites
Contacts
