Audi A4: Vehicles with Coil Springs, Checking the Curb Weight Position for Axle Alignment
The curb weight position must be checked before beginning an axle alignment on vehicles with coil springs. Explanation of the curb weight position.
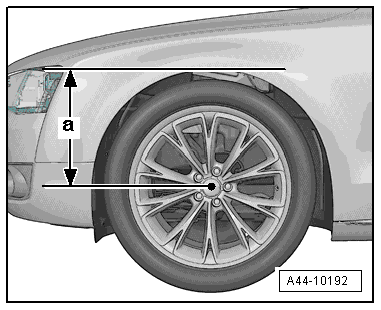
Determine the Dimension -a-
- Determine dimension -a- between the center of the wheel and the lower edge of the fender/wheel housing as shown.
Dimension -a- Overview
.png)
 Note
Note
If the curb weight position is not OK, then a correct axle alignment cannot be performed.
Axle Alignment Specified Values
Conditions
- The specified adjustment values correspond to the curb weight position. To determine the curb weight position, the dimension -a- between the center of the wheel and the lower edge of the fender/wheel housing must be determined. If the curb weight position is not OK, then a correct axle alignment cannot be performed.
.png)
.png)
1) Wheel stop on outer wheel is reduced by this amount. It can also be indicated negatively in the wheel alignment computer depending on manufacturer.
2) Electronic Damping
.png)
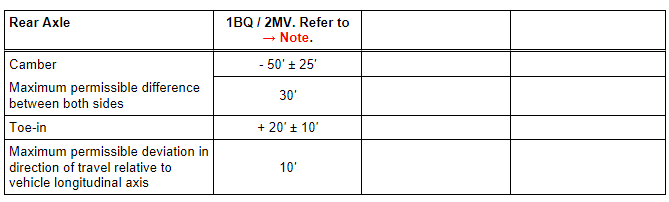
3) Electronic Damping
Additional Vehicle Data
This additional vehicle data only serves for a faster diagnosis in the case of accidents.
Table. Refer to → Chapter "Chassis".
READ NEXT:
 Rear Axle Camber, Adjusting
Caution
This procedure contains mandatory replaceable parts.
Refer to component overview and parts catalog prior to
starting procedure.
Mandatory Replacement Parts
Nut - for Adjusting Bol
Front Axle Camber, Centering
Note
Camber cannot be adjusted.
Camber can be centered evenly within specified tolerance
range by shifting subframe.
Procedure
- Remove the noise insulation. Refer to
→ Body
Dynamic Steering
Overview - Dynamic Steering
1 - Steering Gear
with Power Steering Control Module -J500-
2 - Electromechanical Power Steering Motor -V187-
Steering column component
Do not di
SEE MORE:
Overview - Antenna Systems
Overview - Antenna Systems, Sedan, USA
The antenna systems consist of window antennas, a Roof
Antenna - R216- and bumper antennas.
Window Antennas
Antenna -R11- (AM/FM1)/TV Antenna 1 -R55- (TV1) to the
Antenna Amplifier -R24- at the top of the right D-pillar
TV Antenna 2 -R56- (TV2) to the TV A
General Safety Precautions
As per VBG 20, German industrial liability insurance
association.
Pay attention to the workshop-specific instructions. It
should be kept in the workshop.
Product Characteristics
Refrigerants used in motor vehicle air conditioning systems
belong to the new generation of refrigerants based on
