Audi A4: Overview - Transmission
Audi A4 (B9) 2016-2026 Service Manual / Transmission / 7-Speed Dual Clutch Transmission 0CJ, 0CK, 0CL / Overview - Transmission
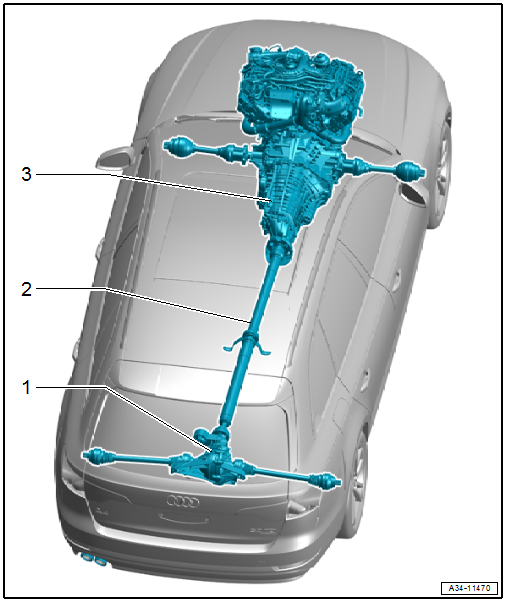
1 - Rear Final Drive
- Only for AWD
- Removing and installing. Refer to → Rear Final Drive; Rep. Gr.39; Final Drive; Final Drive, Removing and Installing.
2 - Driveshaft
- Only for AWD
- Removing and installing. Refer to → Rear Final Drive; Rep. Gr.39; Driveshaft; Driveshaft, Removing and Installing.
3 - 7-Speed Dual Clutch Transmission 0CJ, 0CK, 0CL
Clutch
All work procedures for the dual clutch are described. Refer to → Servicing - 7-Speed Dual Clutch Transmission 0CJ, 0CK, 0CL; Rep. Gr.30; Clutch
READ NEXT:
 Selector Mechanism
Overview - Selector Mechanism
Selector Mechanism in the Vehicle Interior
1 - Selector Mechanism
With the following integrated components:
Selector Lever -E313-
Selector Lever Position
Gearshift Mechanism, Checking
WARNING
Risk of injury and accident by accidentally engaging
a selector lever position with the engine running.
Before working with the engine running, move the
transmission into "P" and
SEE MORE:
Multimedia System Control Head -E380-, Removing and Installing
Multimedia System Control Head -E380-, Removing and Installing, Manual
Transmission
The Multimedia System Control Head -E380- is located in the
center console.
Removing
- Turn off the ignition and all electrical equipment and
remove the ignition key.
Caution
The surfaces can get scr
Gearshift Mechanism, Checking
WARNING
Risk of injury and accident by accidentally engaging
a selector lever position with the engine running.
Before working with the engine running, move the
transmission into "P" and pull the parking brake button
to activate the electro-mechanical parking brake.
Pay attention to t
© 2019-2026 Copyright www.audia4b9.com
