Audi A4: Rear Seats
Overview - Bench Seat/Single Seat
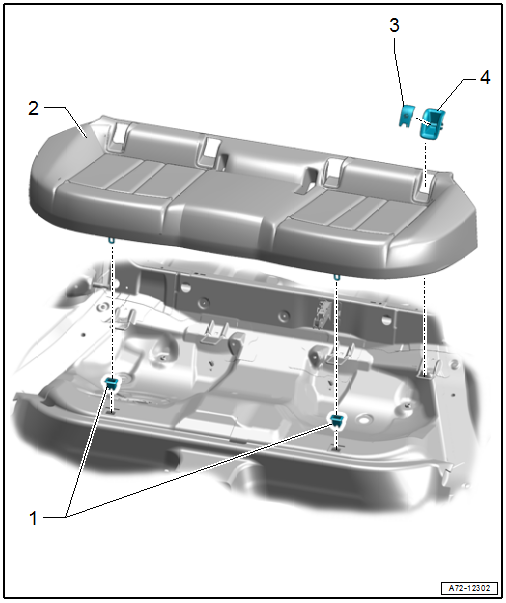
1 - Grommets
- For securing the rear bench seat
- Clipped into the vehicle floor
- Replace each time the bench seat is removed
2 - Bench Seat
- Removing and installing. Refer to → Chapter "Bench Seat/Single Seat, Removing and Installing".
- The seat frame must engage correctly in the mount.
3 - Cap
- For the child seat anchor
- Quantity: 4
- Removing and installing. Refer to → Chapter "Lower Child Seat Anchor Guide, Removing and Installing".
4 - Guide
- For the child seat anchor
- Quantity: 4
- Removing and installing. Refer to → Chapter "Lower Child Seat Anchor Guide, Removing and Installing".
- Must be secure in the anchor
Overview - Headrest and Headrest Guide
 Note
Note
- The headrest guides for the outer folding backrest are shown.
- Headrest guides for the center folding backrest -Item 9-
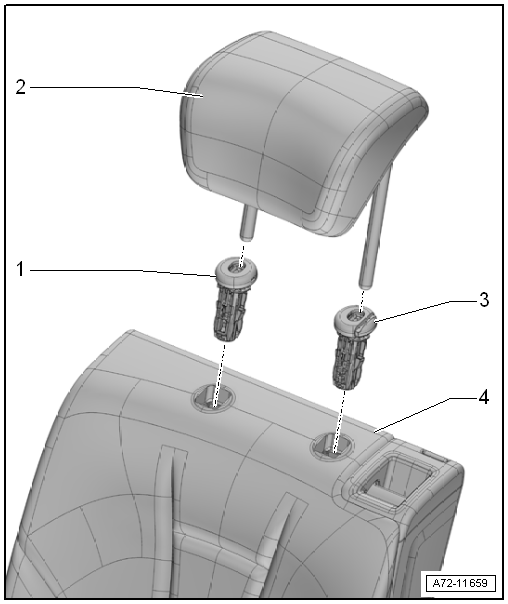
1 - Headrest Guide
- Right side has locking spring
- Removing and installing. Refer to → Chapter "Headrest Guide, Removing and Installing, Outer Folding Backrest".
- The guide tab must engage in the mount cut-out on the headrest guide
- Push in until the retaining tabs correctly latch to the backrest frame.
2 - Headrest
- Removing and installing. Refer to → Chapter "Headrest, Removing and Installing".
- Must be locked in the headrest guides
3 - Headrest Guide
- Left side has headrest height adjustment button
- Removing and installing. Refer to → Chapter "Headrest Guide, Removing and Installing, Outer Folding Backrest".
- The guide tab must engage in the mount cut-out on the headrest guide
- Push in until the retaining tabs correctly latch to the backrest frame.
4 - Rear Seat Backrest
Overview - Rear Seat Backrest
Overview - Rear Seat Backrest, Fixed
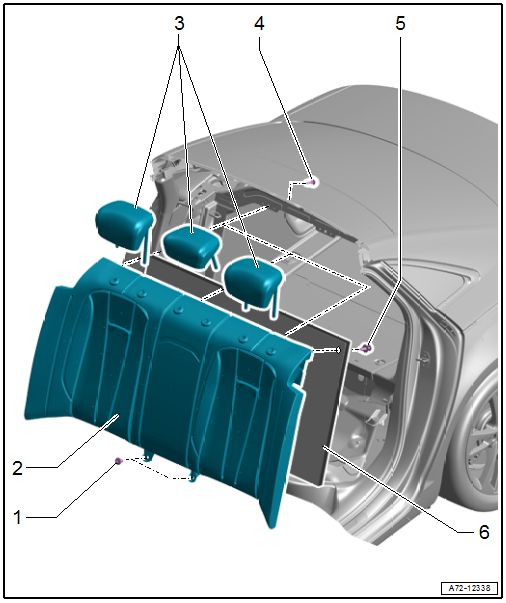
1 - Bolt
- 33 Nm
- Quantity: 2
2 - Fixed Rear Seat Backrest
- Removing and installing. Refer to → Chapter "Rear Seat Backrest, Removing and Installing, Fixed Rear Seat Backrest".
3 - Head restraint
- Overview. Refer to → Chapter "Overview - Headrest and Headrest Guide".
4 - Bolt
- 35 Nm
- Quantity: 3
5 - Clip
- Quantity: 8
6 - Rear Panel Trim Panel
- Removing and installing. Refer to → Chapter "Rear Panel Trim Panel, Removing and Installing, Fixed Rear Seat Backrest".
Overview - Rear Seat Backrest, Folding Backrest

1 - Release Cable
- For backrest remote release
2 - Nut
- 9 Nm
3 - Side Cushion
- Removing and installing. Refer to → Chapter "Side Cushion, Removing and Installing".
4 - Outer Bearing Sleeve
- Place in the backrest frame and push until stop.
5 - Right Folding Backrest with Center Folding Backrest
- Removing and installing. Refer to → Chapter "Rear Seat Backrest, Removing and Installing, Outer Folding Backrest".
6 - Bolt
- 8 Nm
7 - Securing Bracket
- For the center bracket
- Removing and installing. Refer to → Chapter "Center Bracket, Removing and Installing".
8 - Center Support
- Removing and installing. Refer to → Chapter "Center Bracket, Removing and Installing".
9 - Bolt
- 20 Nm
- Quantity: 4
10 - Inner Bearing Pin
- 15 Nm
11 - Inner Bearing Sleeve
Overview - Rear Seat Backrest, Center Folding Backrest

1 - Center Cushion
- Remove downward
- Engage at the folding backrest and press on it until it engages
2 - Bolt
- 4.5 Nm
- Quantity: 2
3 - Bolt
- 4.5 Nm
- Quantity: 2
4 - Stop
5 - Center Folding Backrest Trim Panel
- Removing and installing. Refer to → Chapter "Center Folding Backrest Trim Panel, Removing and Installing".
6 - Trim
- For the center armrest catch
7 - Bolt
- 4.5 Nm
- Quantity: 2
8 - Trim
- For the folding backrest latch
- Cannot be removed without being damaged
- Removing and installing. Refer to → Chapter "Folding Backrest Latch Trim, Removing and Installing".
9 - Headrest Guides
- Cannot be removed without being damaged
- Removing and installing. Refer to → Chapter "Headrest Guide, Removing and Installing, Center Folding Backrest".
10 - Cushion Cover
- Removing and installing. Refer to → Chapter "Center Folding Backrest Cushion Cover, Removing and Installing".
11 - Turning Lock
- For center folding backrest
- To unclip, remove the cushion cover -10-
12 - Center Folding Backrest
- Removing and installing. Refer to → Chapter "Rear Seat Backrest, Removing and Installing, Center Folding Backrest".
13 - Bearing Sleeve
14 - Bolt
- 20 Nm
- Quantity: 2
Overview - Locking Mechanism
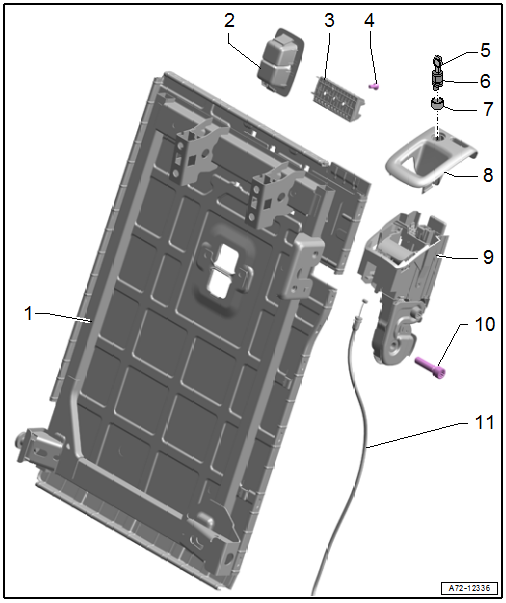
1 - Backrest Frame
- For the left folding backrest
- Right backrest frame with mount for the center folding backrest
2 - Cover
- For the child seat anchor
3 - Screen Separator Mount
4 - Bolt
- Tightening specification. Refer to → Chapter "Overview - Screen Separator".
5 - Key
- Sedan only
6 - Lock Cylinder
- Sedan only
- Removing and installing. Refer to → Chapter "Lock Cylinder, Removing and Installing".
7 - Protective Cap
- For lock cylinder
- Sedan only
- Remove before installing the lock cylinder
8 - Trim
- For locking and lock cylinder
- Removing and installing. Refer to → Chapter "Locking Mechanism Trim, Removing and Installing".
- Press on until it engages audibly
9 - Locking Mechanism
- For the rear seat backrest
- Removing and installing. Refer to → Chapter "Rear Seat Backrest Locking Mechanism, Removing and Installing".
10 - Bolt
- 25 Nm
- Quantity: 2
11 - Release Cable
- For backrest remote release
Overview - Center Armrest
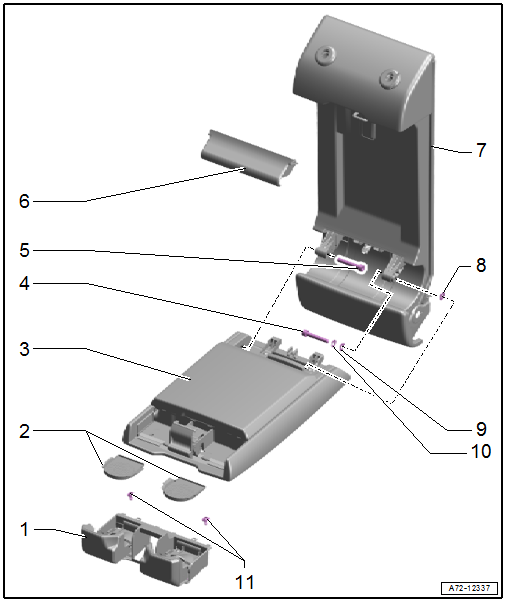
1 - Cupholder
- Removing and installing. Refer to → Chapter "Center Armrest Cupholder, Removing and Installing".
- Install and press on it until it audibly latches
2 - Cupholder Trim
- Left and right sides have different forms
3 - Center Armrest
- Removing and installing. Refer to → Chapter "Center Armrest, Removing and Installing".
4 - Bolt
- 5 Nm
5 - Hinge Pin
6 - Hinge Trim
7 - Center Folding Backrest
- Removing and installing. Refer to → Chapter "Rear Seat Backrest, Removing and Installing, Center Folding Backrest".
8 - Thrust Washer
9 - Thrust Washer
10 - Washer
11 - Bolts
- 3.5 Nm
Overview - Backrest Remote Release
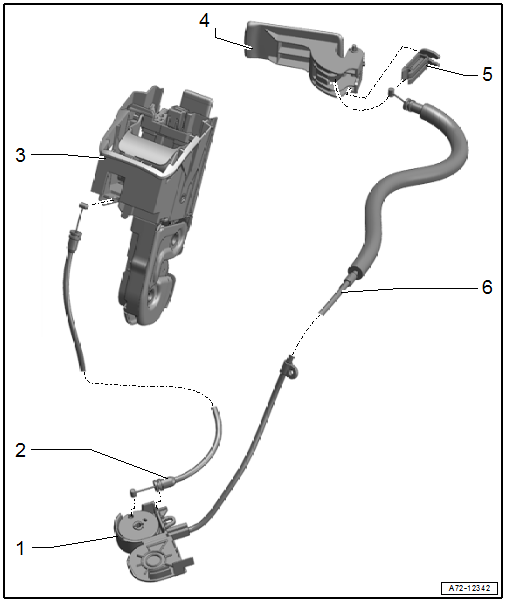
1 - Coupling Housing
- For the release cable
- Clipped onto the vehicle floor under the bench seat
2 - Release Cable
- For the locking mechanism
- Removing and installing. Refer to → Chapter "Rear Seat Backrest Locking Mechanism, Removing and Installing".
3 - Locking Mechanism
- For the rear seat backrest
- Removing and installing. Refer to → Chapter "Rear Seat Backrest Locking Mechanism, Removing and Installing".
4 - Release Lever
- For backrest remote release
- In the luggage compartment side trim panel
5 - Mounting Element
- For the release cable
- Removing and installing. Refer to → Chapter "Luggage Compartment Side Trim Panel, Removing and Installing, Avant".
6 - Release Cable
- For backrest remote release
- Removing and installing. Refer to → Chapter "Luggage Compartment Side Trim Panel, Removing and Installing, Avant".
READ NEXT:
 Bench Seat/Single Seat, Removing and Installing
Removing
- Move the front seats all the way forward.
- Unclip the child seat anchor guides (quantity: four)
-1- from anchorages. Refer to
→ Chapter "Lower Child Seat Anchor Guide, Rem
Rear Seat Backrest, Removing and Installing
Rear Seat Backrest, Removing and Installing, Fixed Rear Seat Backrest
Removing
- Remove the screws -1- in the
luggage compartment.
- Remove the bench seat. Refer to
→ Chapter "Bench
Locking Mechanism Trim, Removing and Installing
Special tools and workshop equipment required
Trim Removal Wedge -3409-
Removing
- Unlock the rear seat backrest.
- Make sure the button -2-
(indicator) is in the "up" position.
- P
SEE MORE:
Service Station, Connecting with No Connection on Low- and High Pressure
Side of Refrigerant Circuit
General Information
On the following vehicles, no service connection is provided
for the service station on the low-pressure side of the
refrigerant circuit; adapters must be used to connect the
service station to the refrigerant circuit on these vehicles:
Audi 80, Audi Cabrio, Audi Coupe
Audi
Floor Heat Shield, Removing and Installing
Plenum Chamber Bulkhead Heat Shield, Removing and Installing
Removing
- Remove the plenum chamber bulkhead. Refer to
→ Chapter "Plenum Chamber Bulkhead, Removing and Installing".
- Remove the lock washers -arrows-.
- Remove the heat shield -1- from the
plenum chamber bulkhead
