Audi A4: Rear Window
Audi A4 (B9) 2016-2026 Service Manual / Body / Body Exterior / Glass, Window Regulators / Rear Window
Overview - Rear Window
Overview - Rear Window, Sedan
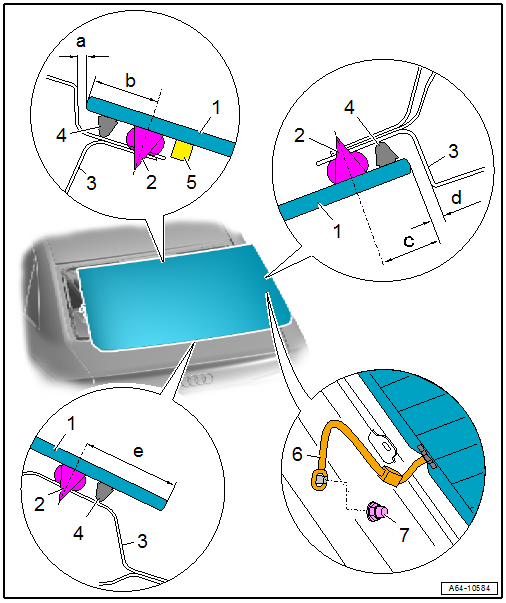
1 - Rear Window
- Removing and installing. Refer to → Chapter "Rear Window, Removing and Installing".
- Distance to roof: dimension -a- = 2 mm
- Distance to C-pillars: dimension -d- = approximately 3 mm; center if necessary
2 - Adhesive Bead
- Observe minimum curing times. Refer to → Chapter "Minimum Curing Times for Bonded Windows".
- Different distances to window edge:
- Dimension -b- = 15.5 mm
- Dimension -c- = 14.5 mm
- Dimension -e- = 27.5 mm
- Adhesive bead thickness.
3 - Rear Window Frame
4 - Spacer
- Quantity: 8
- Place on the markings made on the ceramic coating
5 - Foam Profile
6 - Ground Wire
7 - Nut
- 9 Nm
Overview - Rear Window, Avant
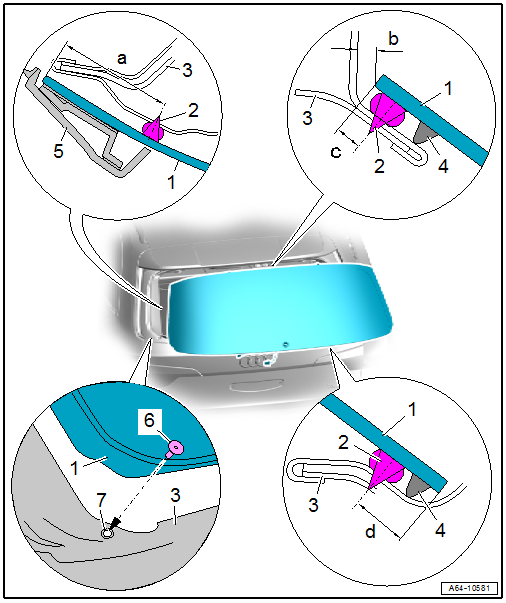
1 - Rear Window
- Removing and installing. Refer to → Chapter "Rear Window, Removing and Installing".
- Distance at top to rear lid: dimension -b- = 2 mm
- Center at the sides
2 - Adhesive Bead
- Observe minimum curing times. Refer to → Chapter "Minimum Curing Times for Bonded Windows".
- Different distances to window edge:
- Dimension -a- = 48.5 mm
- Dimension -c- = 2 mm
- Dimension -d- = 7.5 mm
- Adhesive bead thickness.
3 - Rear Window Frame
- In the rear lid
4 - Spacer
- Quantity: 8
- Place on the markings made on the ceramic coating
5 - Side Spoiler
- For the rear window
- Removing and installing. Refer to → Chapter "Aerodynamic Trim, Removing and Installing".
6 - Centering Pin
- No replacement part
- Is cut through when removing the window
7 - Securing Hole
READ NEXT:
 Rear Window, Removing and Installing
Undamaged Rear Window, Removing and Installing, Sedan
Special tools and workshop equipment
required
Cutting Tool for Bonded Windows -VAS6452-
Cutting Tool for Bonded Windows - Wire Reel -VAS6452/1-
Side Windows
Overview - Rear Side Window
Overview - Rear Side Window, Sedan
1 -
Rear Side Window
Removing and installing. Refer to
→ Chapter "Rear Side Window, Removing and Installing".
After
Rear Side Window, Removing and Installing
Undamaged Side Window, Removing, Sedan
Special tools and workshop equipment
required
Wedge Set -T10383-
Wedge 1 -T10383/1-
Cutting Tool for Bonded Windows -VAS6452-
Bonded Window Tool Kit - Pull Han
SEE MORE:
Wiring Harness Repair Set
Wiring Harness Repair Set -VAS1978-
The Wiring Harness Repair Set -VAS1978- makes optimal repair
quality possible in the realm of vehicle electronics. Using the
tools, repairs affecting harness connectors and for breaks in
wiring can be performed. For this purpose, complete repair wires
with ter
Service and Recycling Units
Extraction System Group Classifications
At this time, service units for extracting, cleaning and
filling refrigerant for motor vehicle A/C systems are available
on the market from various manufacturers.
Only certain service stations (with appropriate auxiliary
device and different adapters if nec
© 2019-2026 Copyright www.audia4b9.com
