Audi A4: Side Windows
Audi A4 (B9) 2016-2026 Service Manual / Body / Body Exterior / Glass, Window Regulators / Side Windows
Overview - Rear Side Window
Overview - Rear Side Window, Sedan
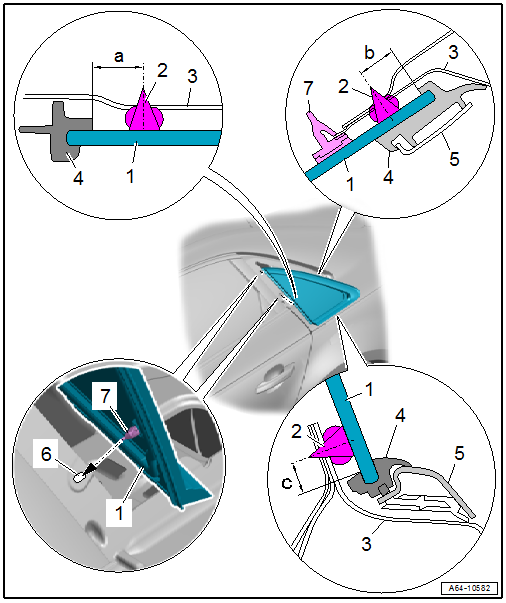
1 - Rear Side Window
- Removing and installing. Refer to → Chapter "Rear Side Window, Removing and Installing".
- After installing, push in using the locating pins -7-
2 - Adhesive Bead
- Observe minimum curing times. Refer to → Chapter "Minimum Curing Times for Bonded Windows".
- Different distances to window edge:
- Dimension -a- = 8 mm
- Dimension -b- = 7.5 mm
- Dimension -c- = 7.5 mm
- Adhesive bead thickness.
3 - Side Window Frame
4 - Molding
- Must not be damaged in the visible area
5 - Trim Molding
- Only for versions with the gloss package
6 - Securing Hole
7 - Centering Pin
- No replacement part
- Is cut through when removing the window
Overview - Rear Side Window, Avant
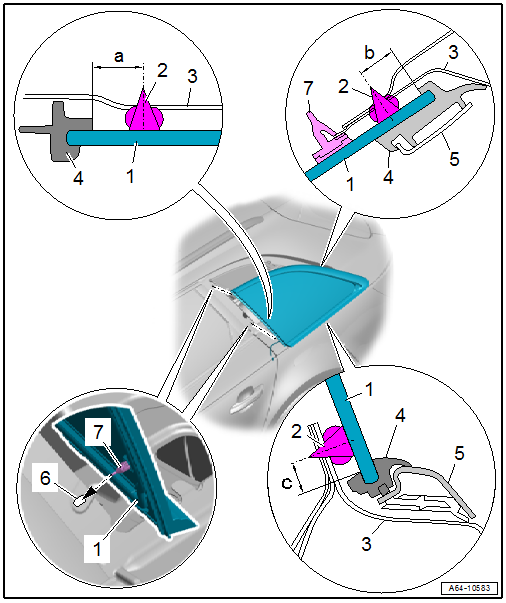
1 - Rear Side Window
- Removing and installing. Refer to → Chapter "Rear Side Window, Removing and Installing".
- After installing, push in using the locating pins -7-
2 - Adhesive Bead
- Observe minimum curing times. Refer to → Chapter "Minimum Curing Times for Bonded Windows".
- Different distances to window edge:
- Dimension -a- = 8.5 mm
- Dimension -b- = 7.5 mm
- Dimension -c- = 7.5 mm
- Adhesive bead thickness.
3 - Side Window Frame
4 - Molding
- Must not be damaged in the visible area
5 - Trim Molding
- Only for versions with the gloss package
6 - Securing Hole
7 - Centering Pin
- No replacement part
- Is cut through when removing the window
READ NEXT:
 Rear Side Window, Removing and Installing
Undamaged Side Window, Removing, Sedan
Special tools and workshop equipment
required
Wedge Set -T10383-
Wedge 1 -T10383/1-
Cutting Tool for Bonded Windows -VAS6452-
Bonded Window Tool Kit - Pull Han
Door Windows
Overview - Front Door Window
1 -
Window Regulator
Overview. Refer to
→ Chapter "Overview - Window Regulator".
2 -
Door Window
Removing and installing. Refer to
→&n
SEE MORE:
Safety Precautions
Safety Precautions when Working on Vehicles with Start/Stop System
There is a risk of injury due to the engine starting
unexpectedly.
The engine can start unexpectedly on vehicles with an activated
Start/Stop System. A message in the instrument cluster indicates
whether the Start/Stop System is a
Seat Belt Latch, Function Test
Seat Belt Latch, Checking
- Insert the belt tongue into the seat belt latch until it clicks
into place. Check whether the locking mechanism is properly
engaged by giving the seat belt webbing a firm jerk.
Replace the entire seat belt with the seat belt latch if the
belt tongue fails even o
© 2019-2026 Copyright www.audia4b9.com
