Audi A4: Right and Left Multifunction Buttons on Steering Wheel -E441-/-E440-, Removing and Installing
Right and Left Multifunction Buttons on Steering Wheel -E441-/-E440-, Removing and Installing, Steering Wheel with Round Airbag
Special tools and workshop equipment required
- Trim Removal Wedge -3409-
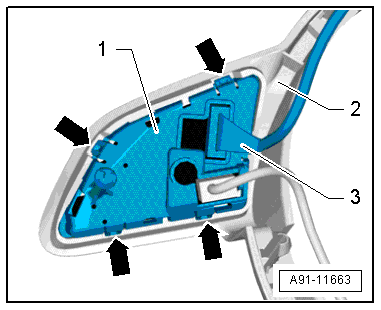
The multifunction buttons -2- are clipped to the decorative trim -1-. The decorative trim -1- and the multifunction buttons -2- are attached to the steering wheel. The multifunction buttons -2- have two extra retainers -3-.
When removing, first make sure the decorative trim -1- can be loosened by hand (approximately 5 mm). Then, using the Trim Removal Wedge -3409-, open the retainers -3- on the multifunction buttons -2- and remove the decorative trim -1- together with the multifunction buttons -2-.
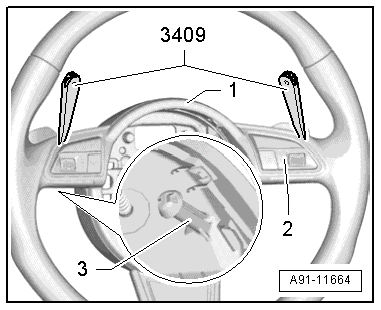
Decorative Trim Retainers
1 - Decorative Trim
Arrows - catches
Removing
- Turn off the ignition and all electrical equipment and remove the ignition key.
- Remove the driver airbag. Refer to → Body Interior; Rep. Gr.69; Driver Airbag; Overview - Driver Airbag.
- Remove the connecting wires from the guides in the steering wheel.
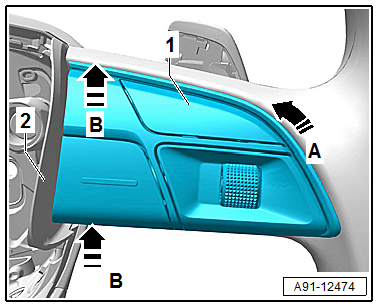
- Loosen the trim panel -2- with the multifunction buttons by hand -arrows- and remove it approximately 5 mm from the steering wheel -1-.
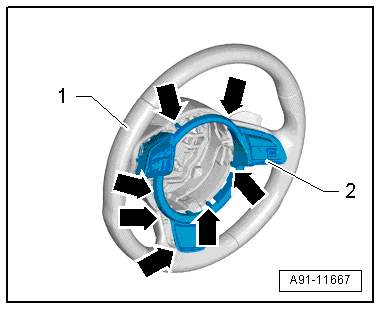
- Release the multifunction buttons -2- with the Trim Removal Wedge -3409- next to the catches -3- (on the inside of the multifunction buttons). For this place the Trim Removal Wedge -3409- first on the top and then on the bottom of the multifunction buttons -2-.
- While doing this, be careful of the connectors to the tiptronic switches -2-.
- Release and disconnect the connector -2- from the multifunction buttons.
- Remove the decorative trim with the multifunction buttons from the steering wheel.
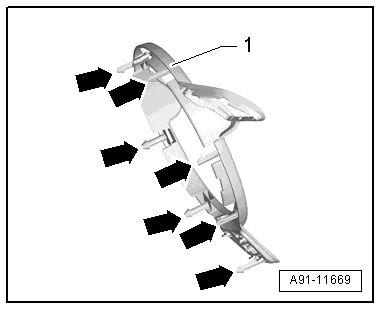
The multifunction buttons are attached to the decorative trim.
- Disconnect and remove the connector -3- from the multifunction button -1-.
- Open the clips -arrows- and push the multifunction button -1- out of the decorative trim -2-.
The additional wire on the right multifunction button remains on the button.
Installing
- Install in reverse order of removal. Note the following:
- Place the decorative trim with mounted multifunction buttons onto the steering wheel.
- Route the connection cable for the tiptronic switch -2- as shown.
- Route the rest of the connection cable, including the connectors, into the guides in the steering wheel.
- Push the decorative trim -2- with multifunction buttons onto the steering wheel -1- until it engages securely.
- Finally, check the steering wheel again to make sure the wiring is correct.
Right and Left Multifunction Buttons on Steering Wheel -E441-/-E440-, Removing and Installing, Steering Wheel with Trapezoidal Airbag
Special tools and workshop equipment required
- Trim Removal Wedge -3409-
The multifunction buttons are engaged in the steering wheel.
Removing
- Turn off the ignition and all electrical equipment and remove the ignition key.
- Remove the driver airbag. Refer to → Body Interior; Rep. Gr.69; Driver Side Airbag; Airbag Unit with Igniter, Removing and Installing.
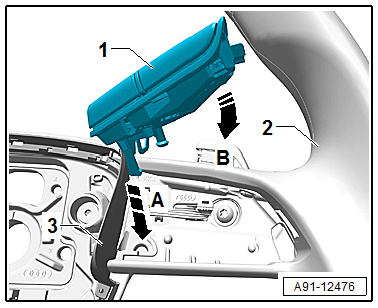
- Release and remove the decorative trim -2-.
- Release the multifunction button -1- with the Trim Removal Wedge - 3409- next to the catch in the direction of -arrow B-.
- Pry out the multifunction button -1- on the other side in the direction of -arrow A- using the Trim Removal Wedge -3409-.
- Release and disconnect the connectors on the multifunction button.
Installing
- Install in reverse order of removal. Note the following:
- Attach and engage the connectors on the multifunction button.
- Insert the inner multifunction button -1- and then engage in the direction of -arrow A-.
- Insert the outer multifunction button -1- and then engage -arrow B-.
- Insert and engage the decorative trim -3-.
Tiptronic Downshift and Upshift Button on Steering Wheel -E439-/-E438-, Removing and Installing
Removing
- Turn off the ignition and all electrical equipment and remove the ignition key.
- Remove the decorative trim with the multifunction buttons. Refer to → Chapter "Right and Left Multifunction Buttons on Steering Wheel -E441-/-E440-, Removing and Installing".
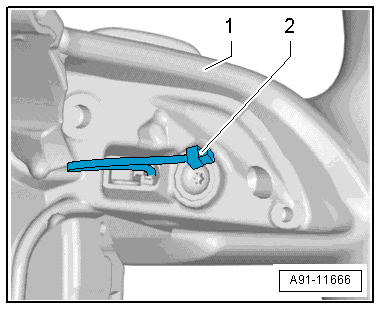
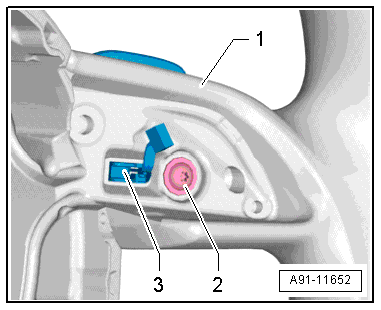
- Remove the bolt -2- on the steering wheel -1- and remove the Tiptronic switch -3- with the connecting cable toward the rear.
Installing
- Install in reverse order of removal. Note the following:
- Pay attention to the location of the connecting cable -2- to the multifunction button.
Tightening Specifications
- Refer to → Chapter "Overview - Multifunction Steering Wheel"
READ NEXT:
 Connection for External Multimedia Devices
Overview - Connection for External Multimedia Devices
There are several External Audio Source Connection -R199-
versions:
USB Charging - AUX IN, UE4
AMI (Audi music interface) - USB connection (qu
Rear Seat Entertainment System (RSE)
Overview - Rear Seat Entertainment System
The Rear Seat Entertainment System (RSE, 9WF) consists of:
Left Rear Information Display Control Head Control Module
-J648-/Right Rear Information Display
SEE MORE:
Vehicles with Coil Springs, Checking the Curb Weight Position for Axle
Alignment
The curb weight position must be checked before beginning an
axle alignment on vehicles with coil springs. Explanation of the
curb weight position.
Determine the Dimension -a-
- Determine dimension -a- between
the center of the wheel and the lower edge of the fender/wheel
housing as shown.
Drive system
Braking in
A new vehicle must be broken in within the first
1,000 miles (1,500 km) so that all moving parts
work smoothly together, which helps to increase
the service life of the engine and other drive components.
Do not drive higher than two-thirds of the maximum
permitted engine RPM during the f
