Audi A4: Rear Seat Entertainment System (RSE)
Overview - Rear Seat Entertainment System
The Rear Seat Entertainment System (RSE, 9WF) consists of:
- Left Rear Information Display Control Head Control Module -J648-/Right Rear Information Display Control Head Control Module -J649- on the left/right front seat backrest frame
- Information Electronics Control Module 1 -J794- in the Glove Compartment
- Multimedia Display Unit 3 Bracket -R315-/Multimedia Display Unit 4 Bracket -R316- on the left/right front seat backrest
- Multimedia Display Unit 3 -Y31-/Multimedia Display Unit 4 -Y32- on the Multimedia Display Unit 3 Bracket -R315-/Multimedia Display Unit 4 Bracket -R316-
Component Location Overview - Rear Seat Entertainment System
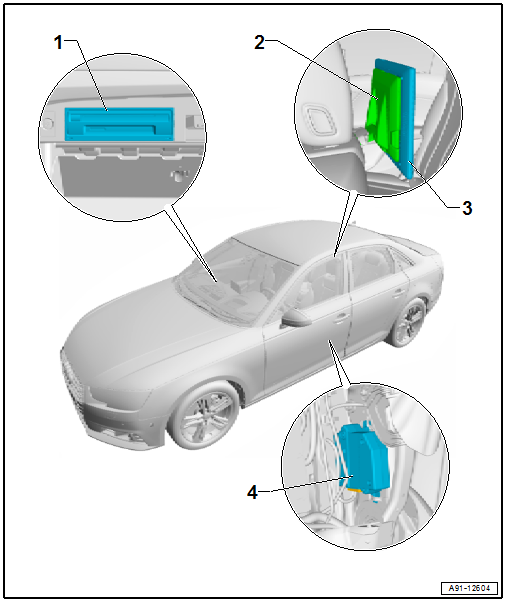
1 - Information Electronics Control Module 1 -J794-
- Connector Assignment. Refer to → Wiring diagrams, Troubleshooting & Component locations.
- Removing and Installing. Refer to → Chapter "Information Electronics Control Module 1 -J794-, Removing and Installing".
2 - Multimedia Display Unit 3 Bracket -R315-/Multimedia Display Unit 4 Bracket -R316-
- On the left/right front seat backrest
- Removing and Installing. Refer to → Chapter "Multimedia Display Unit 3 Bracket -R315-/Multimedia Display Unit 4 Bracket -R316-, Removing and Installing".
3 - Multimedia Display Unit 3 -Y31-/Multimedia Display Unit 4 -Y32-
- On the Multimedia Display Unit 3 -Y31-/Multimedia Display Unit 4 -Y32-
- Removing and Installing. Refer to → Chapter "Multimedia Display Unit 3 -Y31-/Multimedia Display Unit 4 -Y32-, Removing and Installing".
4 - Left Rear Information Display Control Head Control Module -J648-/Right Rear Information Display Control Head Control Module -J649-
- On the right/left front seat backrest frame
- Connector Assignment. Refer to → Wiring diagrams, Troubleshooting & Component locations.
- Removing and Installing. Refer to → Chapter "Left/Right Rear Information Display Control Head Control Module -J648-/-J649-, Removing and Installing".
Multimedia Display Unit 3 -Y31-/Multimedia Display Unit 4 -Y32-, Removing and Installing
The Multimedia Display Unit 3 -Y31-/Multimedia Display Unit 4 -Y32- is installed on the Multimedia Display Unit 3 Bracket -R315-/Multimedia Display Unit 4 Bracket -R316- on the top of the left/right front seat backrest.
 Note
Note
The removal and installation is described for the left side. Removing and installing on the right side is identical.
Removing
- Turn off the ignition and all electrical equipment and remove the ignition key.
- Release the catches -3- on the Multimedia Display Unit 4 Bracket -R316--2- in the direction of the arrow -A-.
- Remove the Multimedia Display Unit 4 -Y32--1- at the same time in the direction of the -arrow B- from the Multimedia Display Unit 4 Bracket -R316--2-.
- Remove the Multimedia Display Unit 4 -Y32--1- in the direction of the -arrow C- from the Multimedia Display Unit 4 Bracket -R316--2-.
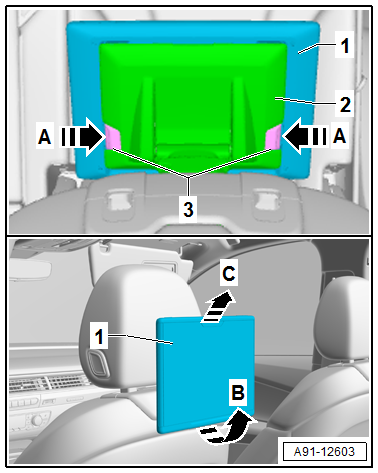
Installing
- Install in reverse order of removal. Note the following:
- Install the Multimedia Display Unit 4 -Y32- until it engages audibly in the Multimedia Display Unit 4 Bracket -R316-.
Multimedia Display Unit 3 Bracket -R315-/Multimedia Display Unit 4 Bracket -R316-, Removing and Installing
The Multimedia Display Unit 3 Bracket -R315-/Multimedia Display Unit 4 Bracket -R316- is installed at the top on the right/left front seat backrest.
Note
The removal and installation is described for the left side. Removing and installing on the right side is identical.
Removing
- Turn off the ignition and all electrical equipment and remove the ignition key.
- Remove the Multimedia Display Unit 4 -Y32-. Refer to → Chapter "Multimedia Display Unit 3 -Y31-/Multimedia Display Unit 4 -Y32-, Removing and Installing".
- Release the catch -1- on the Multimedia Display Unit 4 Bracket - R316--2- in the direction of the -arrow-.
- Remove the Multimedia Display Unit 4 Bracket -R316--2- toward the rear from the left front seat backrest.
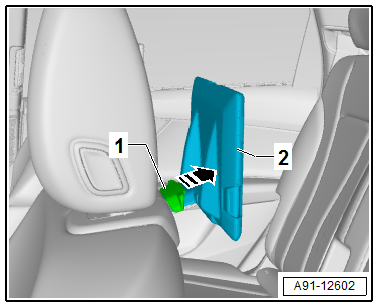
Installing
- Install in reverse order of removal. Note the following:
- Push in the Multimedia Display Unit 4 Bracket -R316- until it engages audibly in the left front seat backrest.
Left/Right Rear Information Display Control Head Control Module -J648-/-J649-, Removing and Installing
The Left Rear Information Display Control Head Control Module -J648-/Right Rear Information Display Control Head Control Module -J649- is installed on the inside of the right/left front seat backrest frame.
Note
The removal and installation is described for the left side. Removing and installing on the right side is identical.
Removing
- Turn off the ignition and all electrical equipment and remove the ignition key.
- Remove the cover and cushion. Refer to → Body Interior; Rep. Gr.74; Front Seat Cover and Cushion; Backrest Cover and Cushion, Removing and Installing.
- Push the Left Rear Information Display Control Head Control Module -J648--1- carefully in the direction of the -arrow A- from the upper eye on the backrest frame.
- Push the Left Rear Information Display Control Head Control Module - J648--1- in the direction of the -arrow B- from the lower eye on the backrest frame.
- Engage the connector -2- on the Left Rear Information Display Control Head Control Module -J648--1- and disconnect.
- Unclip the wires from the Left Rear Information Display Control Head Control Module -J648--1-.
- Remove the Left Rear Information Display Control Head Control Module -J648--1-.
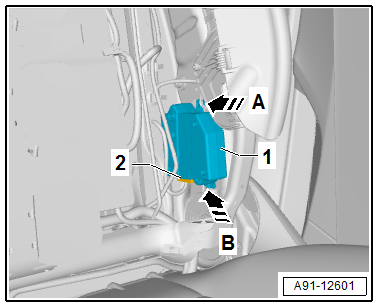
Installing
- Installation is identical in reverse order of removal.
READ NEXT:
 Overview - Peripheral Camera System
The peripheral camera system (KA6) consists of four cameras.
They are located in the radiator grille, in both side exterior
mirrors and in the rear lid. The system helps the driver when
parking, ma
Peripheral Camera Control Module -J928-, Removing and Installing
The Peripheral Camera Control Module -J928- is located
behind the left luggage compartment trim panel.
Note
If replacing the control module, select the "Replace control
module" function for
SEE MORE:
General information
Selecting the radio
Fig. 148 Center display: FM station list
Fig. 149 Center display: SiriusXM station list
Depending on the vehicle equipment, the radio
may support the FM, AM, and SiriusXM (satellite
radio) frequency bands. Using the HD Radio receiver*
also allows you to receive radio stations
o
Sill Panel, Removing and Installing
Front Sill Panel Strip, Removing and Installing
Special tools and workshop equipment required
Trim Removal Wedge -3409-
Omega Clip Tool -T40280-
Removing
- Move the front seat all the way back.
- Remove the instrument panel side cover. Refer to
→ Chapter "Instrument Panel Side C
