Audi A4: Seat Pan, Disassembling and Assembling
Front and Rear Seat Rail Cover, Removing and Installing
Removing
- Move the front seat into its highest position.
 Caution
Risk of damaging the seat rail cover.
Proceed very carefully when removing and installing.
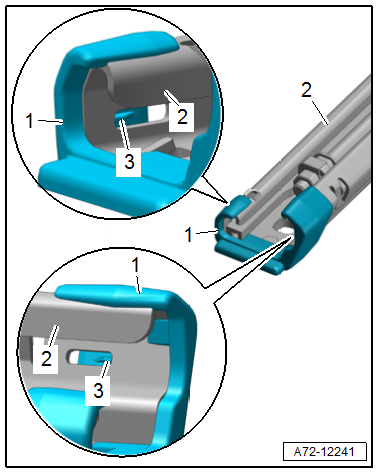
- Carefully release the tabs -3- on the seat rail with a screwdriver and remove the cover -1- from the seat rail -2-.
Installing
Install in reverse order of removal.
Installation instructions: For example tightening specifications, replacing components. Refer to → Chapter "Overview - Seat Pan, Trim Panels".
Center Seat Rail Cover, Removing and Installing
Removing
- Move the front seat into its highest position.
- Remove the seat side trim on the side sill side. Refer to → Chapter "Seat Side Trim on Side Sill Side, Removing and Installing".
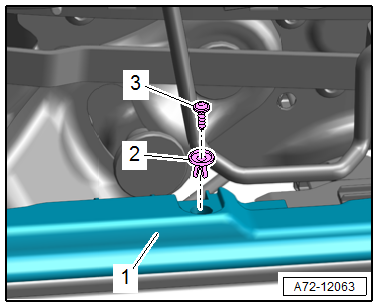
- Remove the threaded stud -3- and remove the expanding clip -2- from the center seat rail cover -1-.
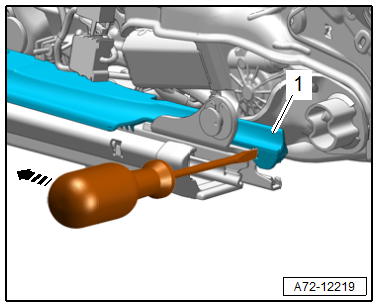
- Carefully release the rear hook on the seat rail using a screwdriver in the direction of -arrow-.
- Push the center seat rail cover -1- in the direction of travel and remove it.
Installing
Install in reverse order of removal.
Installation instructions: For example tightening specifications, replacing components. Refer to → Chapter "Overview - Seat Pan, Trim Panels".
Seat Side Trim on Side Sill Side, Removing and Installing
Removing
- Move the front seat into its highest position.
- Equipped on some models: Remove the backrest adjustment hand wheel. Refer to → Chapter "Backrest Adjustment Hand Wheel, Removing and Installing".
- Equipped on some models: Remove the seat height adjuster handle. Refer to → Chapter "Seat Height Adjuster, Removing and Installing, Seat Height Adjustment Handle".
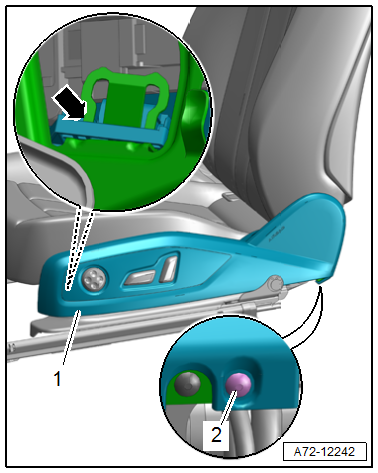
- Remove the expanding rivet -2-.
- Disengage the front inner bracket -arrow- upward from the seat side trim.
- Pull the seat side trim -1- upward and remove.
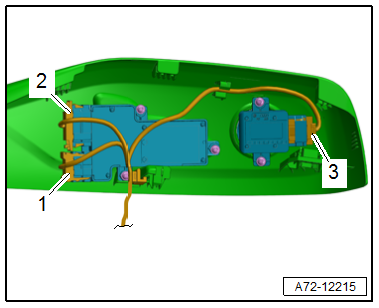
- Equipped on some models: disconnect the connectors, to do this press the release.
1, 2 - Driver Seat Adjustment Control Head -E470-/ Front Passenger Seat Adjustment Control Head -E471-
3 - Driver Seat Lumbar Support Adjustment Switch -E176-/ Front Passenger Seat Lumbar Support Adjustment Switch -E177-
- Free up the wiring harness.
- Remove the seat side trim on side sill side.
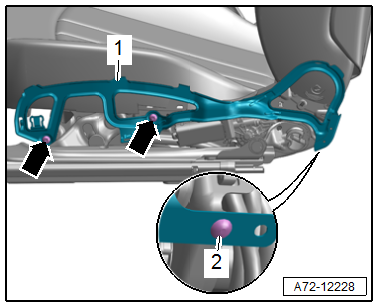
Remove the bracket for the seat side trim on the side sill side.
- Remove the expanding rivet -2-.
- Remove the bolts -arrows- and the bracket -1-.
Installing
Install in reverse order of removal and note the following:
 Note
Note
Make sure the connectors are pushed in all the way and that they engage audibly.
Installation instructions: For example tightening specifications, replacing components. Refer to → Chapter "Overview - Seat Pan".
Seat Side Trim on Tunnel Side, Removing and Installing
Removing
- Unscrew the front seat and tip forward with the wires attached. Refer to → Chapter "Front Seat, Removing and Installing".
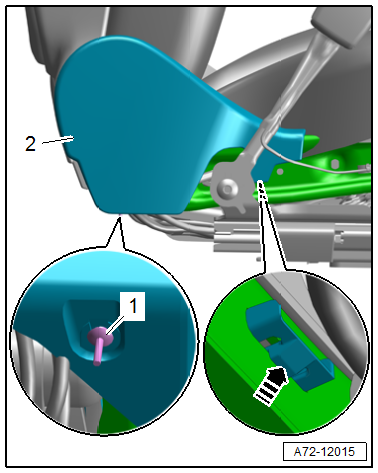
- Remove the expanding rivet -1-.
- Press down the tab in the direction of -arrow- at the inside of the seat rail.
- Remove the seat side trim on the tunnel-side -2-.
Installing
Install in reverse order of removal.
Installation instructions: For example tightening specifications, replacing components. Refer to → Chapter "Overview - Seat Pan, Trim Panels".
Front Seat Trim, Removing and Installing
Removing
- Move seat depth adjuster forward.
- Unscrew the front seat and tip forward with the wires attached. Refer to → Chapter "Front Seat, Removing and Installing".
- Release the hooks -arrows- from the front seat trim -1-.
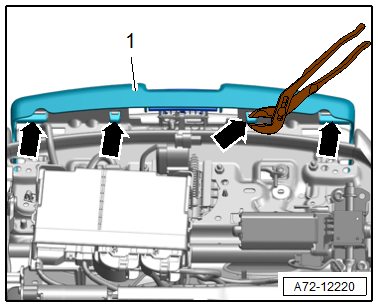
- Disengage the front seat trim -1- downward -arrows-.

Installing
Install in reverse order of removal.
Installation instructions: For example tightening specifications, replacing components. Refer to → Chapter "Overview - Seat Pan, Trim Panels".
Seat Depth Adjuster, Removing and Installing
Special tools and workshop equipment required
- Hook Tool -T40207-
Removing
- Remove the front seat trim. Refer to → Chapter "Front Seat Trim, Removing and Installing".
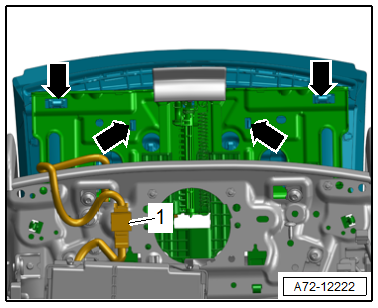
- Disconnect the connector -1-.
- Release the hooks -arrows- and fold the retaining plate with the cushion and cover toward the rear.
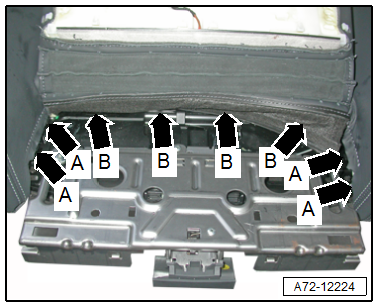
- Disengage the contour wire from the hooks -arrows A- on the left and right sides.
- Using the -T40207-, disengage the cover clamping strip from the hooks -arrows B-.
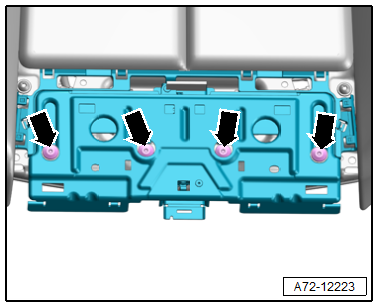
- Move the seat depth adjuster back again so that the bolt heads -arrows- are accessible.
- Remove the bolts by counterholding the nuts below.
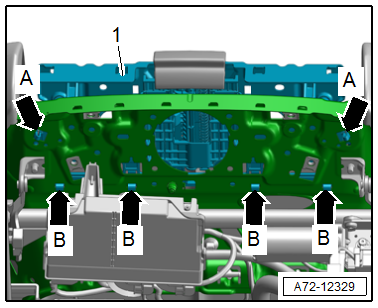
- Unclip the seat depth adjuster -1- at the tabs -arrows A- and remove it upward from the seat pan.
- Disengage the seat depth adjuster at the tabs -arrows B- from the seat pan.
Installing
Install in reverse order of removal.
Installation instructions: For example tightening specifications, replacing components. Refer to → Chapter "Overview - Seat Pan, Seat with Seat Depth Adjuster".
READ NEXT:
 Driver/Front Passenger Seat Adjustment Control Head -E470-/-E471-,
Removing and Installing
Driver/Front Passenger Seat Adjustment Control Head -E470-/-E471-,
Removing and Installing
Special tools and workshop equipment required
Trim Removal Wedge -3409-
Removing
- Carefully pry the actuators -1 and 2-
from the retainer using the -3409-.
- Remove the seat side trim o
Rear Seats
Overview - Bench Seat/Single Seat
1 - Grommets
For securing the rear bench seat
Clipped into the vehicle floor
Replace each time the bench seat is removed
2 - Bench Seat
Re
Bench Seat/Single Seat, Removing and Installing
Removing
- Move the front seats all the way forward.
- Unclip the child seat anchor guides (quantity: four)
-1- from anchorages. Refer to
→ Chapter "Lower Child Seat Anchor Guide, Rem
SEE MORE:
Current Draw Test
WARNING
Do not check or charge a Battery -A- when the visual
indicator has "no color or is
bright yellow". Jump starting must not be used!
There is a risk of explosion during testing,
charging or jump starting.
These Batteries -A- must be replaced.
Make sure the correct charging mode is
Service Station, Connecting with No Connection on Low- and High Pressure
Side of Refrigerant Circuit
General Information
On the following vehicles, no service connection is provided
for the service station on the low-pressure side of the
refrigerant circuit; adapters must be used to connect the
service station to the refrigerant circuit on these vehicles:
Audi 80, Audi Cabrio, Audi Coupe
Audi
