Audi A4: Subframe, Securing
Special tools and workshop equipment required
- Torque Wrench 1331 5-50Nm -VAG1331-
- Torque Wrench 1332 40-200Nm -VAG1332-
- Engine and Gearbox Jack -VAS6931-
- Gearbox Support -T40173-
- Locating Pins -T40327-, not illustrated
- Engine Support Bridge -10-222A-
Procedure
 WARNING
There is a risk of an accident due to an unsecured engine/transmission subassembly!
The engine must be supported in the installation position for the following steps.
- Support the engine in the installation position. Refer to → Rep. Gr.10; Subframe Mount; Engine, Supporting in Installation Position.
- Remove the front wheels. Refer to → Chapter "Wheels and Tires".
- Remove the noise insulation. Refer to → Body Exterior; Rep. Gr.66; Noise Insulation; Noise Insulation, Removing and Installing.
- Remove the left and right wheel spoilers. Refer to → Body Exterior; Rep. Gr.66; Wheel Housing Liner; Front Wheel Housing Liner, Removing and Installing.
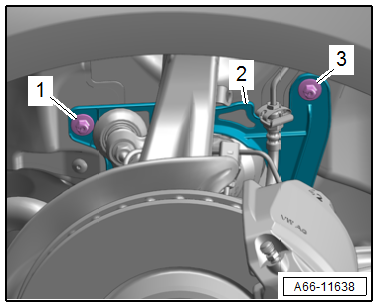
- Remove the nuts -1 and 3- and remove the drive axle cover -2-.
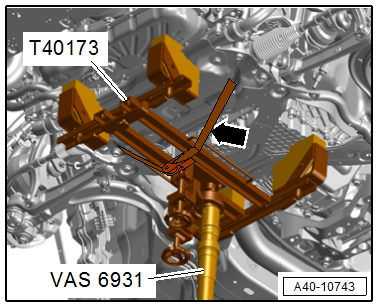
- Support the subframe with the -VAS6931- and the -T40173- as shown.
- Secure the subframe with the tensioning strap -arrow-.
 Caution
There is a risk of damaging the threads on the subframe threaded connection to the body.
- The subframe bolts on the body must not be loosened or tightened with an impact wrench.
- Always install all bolts by hand for the first few turns.
 Note
Note
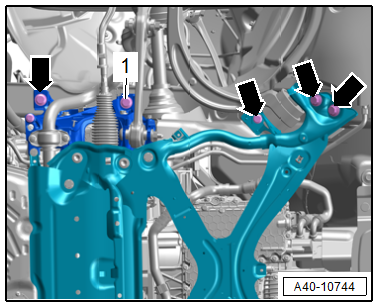
- To secure the subframe, a -T40327- must be installed at position -1- on the left and right side.
- The locating pins must only be tightened to a maximum of 20 Nm or else the locating pin bolts will be damaged.
- Due to the ribbed washers for the bolts, the holes for the subframe are slightly peened. They must be deburred if necessary.
- Replace the bolts -1- on both sides of the vehicle with the -T40327- and tighten to 20 Nm.
- The suspension is now secured.
- Remove the bolts on the left and right side -arrows-.
Remove the -T40327-
Removal is performed in the reverse order. Note the following:
- Remove the locating pins and tighten a new bolt at this position.
Caution
There is a risk of damaging the threads on the subframe threaded connection to the body.
- The subframe bolts on the body must not be loosened or tightened with an impact wrench.
- Always install all bolts by hand for the first few turns.
WARNING
Risk of accident!
If the vehicle will be driving on the streets, all bolts and nuts must be tightened properly according to the guidelines.
- Remove the -10-222A-. Refer to → Rep. Gr.10; Subframe Mount; Engine, Supporting in Installation Position.
- A road test must be performed after completing repairs. If the steering wheel is crooked, the wheels must be aligned. Refer to → Chapter "Axle Alignment".
Tightening Specifications
- Refer to → Chapter "Overview - Subframe"
- Refer to → Body Exterior; Rep. Gr.66; Noise Insulation; Overview - Noise Insulation.
- Refer to → Body Exterior; Rep. Gr.66; Wheel Housing Liner; Overview - Front Wheel Housing Liner.
- Refer to → Chapter "Wheels and Tires"
READ NEXT:
 Subframe, Lowering
Special tools and workshop equipment required
Torque Wrench 1331 5-50Nm -VAG1331-
Torque Wrench 1332 40-200Nm -VAG1332-
Tensioning Straps -T10038-
Engine and Gearbox Jack -VAS6931-
Locating Pins
Subframe with Steering Gear, Removing and Installing
Special tools and workshop equipment required
Torque Wrench 1331 5-50Nm -VAG1331-
Torque Wrench 1332 40-200Nm -VAG1332-
Engine and Gearbox Jack -VAS6931-
Ball Joint Splitter -VAS251805-, not illu
Subframe Crossbrace, Removing and Installing
Special tools and workshop equipment required
Torque Wrench 1331 5-50Nm -VAG1331-
Engine and Gearbox Jack -VAS6931-
Puller - Ball Joint -T40043-
Gearbox Support -T40173-
Locating Pin -T40334-
SEE MORE:
Introduction
Depending on the vehicle equipment, various
parking aids will help you when parking and maneuvering.
Parking aid
The parking aid plus assists you while parking
using audio and visual signals to warn you about
objects detected in front of, behind, and next to*
the vehicle.
The rearview camera shows
General Information
Vehicles with a High Voltage System (Hybrid Vehicles)
Extremely Dangerous Due to High-Voltage
The high-voltage system is under high-voltage. Death or serious
bodily injury by electric shock.
- Individuals with electronic/medical life- and health sustaining
machines in or on their person canno
