Audi A4: Voltage Regulator, Bosch Generator from 2001, Removing and Installing
Removing
- Remove the generator. Refer to → Electrical Equipment; Rep. Gr.27; Generator; Generator, Removing and Installing.
- Remove the bolt -1- and the nuts -3- and -4-.
- Remove the cover -2- on the rear side of the generator.
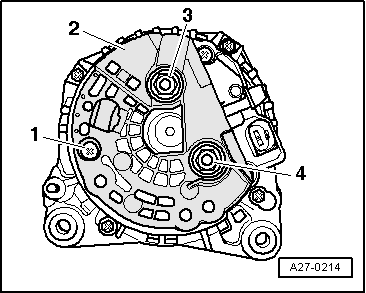
- Remove the bolts -arrows-.
- Remove voltage regulator.
Installing
- When installing the voltage regulator, make sure the carbon brushes rest correctly on the slip rings.
Install in reverse order of removal, observing the following:
- Install the generator. Refer to → Electrical Equipment; Rep. Gr.27; Generator; Generator, Removing and Installing.
- Tightening specification. Refer to → Chapter "Overview - Bosch Generator from 2001".
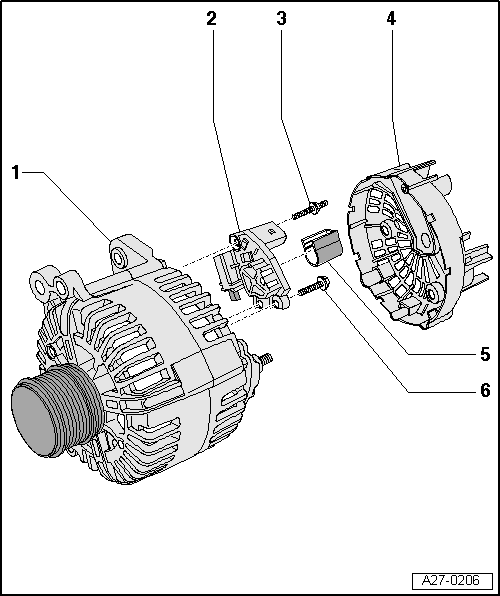
Overview - Bosch Generator from 2007
 Note
Note
The new generators are installed as a running change.
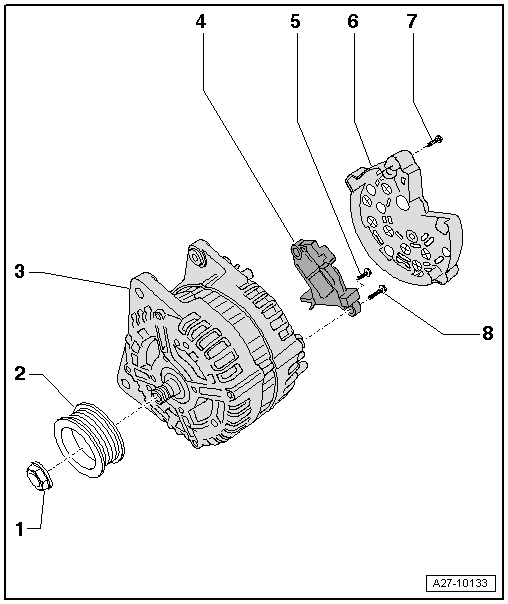
1 - Nut
- 65 Nm
2 - Ribbed Belt Pulley
3 - Generator
4 - Voltage Regulator
- Removing and installing. Refer to → Chapter "Voltage Regulator, Removing and Installing, Bosch Generator from 2007".
- Carbon brushes, checking. Refer to → Chapter "Carbon Brushes, Checking, All Bosch Generators from 2001"
5 - Bolt
- 1.5 Nm
6 - Cover
7 - Bolt
- 3 Nm
8 - Bolt
- 2.5 Nm
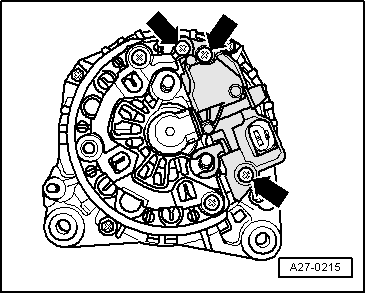
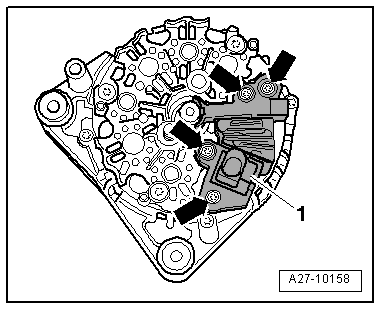
Voltage Regulator, Removing and Installing, Bosch Generator from 2007
Removing
- Remove the generator. Refer to → Electrical Equipment; Rep. Gr.27; Generator; Generator, Removing and Installing.
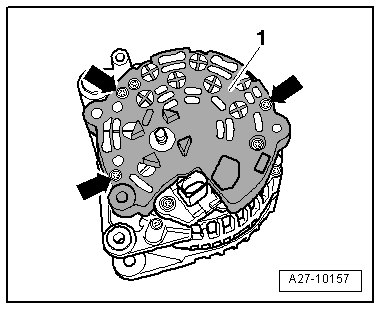
- Remove the bolts -arrows-.
- Remove the cover -1- on the rear side of the generator.
- Remove the bolts -arrows-.
- Remove voltage regulator -1-.
Installing
- When installing the voltage regulator, make sure the carbon brushes rest correctly on the slip rings.
Install in reverse order of removal, observing the following:
- Install the generator. Refer to → Electrical Equipment; Rep. Gr.27; Generator; Generator, Removing and Installing.
- Tightening specification. Refer to → Chapter "Overview - Bosch Generator from 2001".
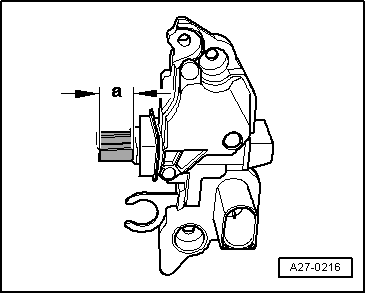
Carbon Brushes, Checking, All Bosch Generators from 2001
Procedure
- Remove the voltage regulator: to 2007. Refer to → Chapter "Voltage Regulator, Bosch Generator from 2001, Removing and Installing", after 2007 → Chapter "Voltage Regulator, Removing and Installing, Bosch Generator from 2007".
- Check the length -a- of the carbon brushes.
- Wear limit: -a- = 5 mm.
- Install the voltage regulator: to 2007. Refer to → Chapter "Voltage Regulator, Bosch Generator from 2001, Removing and Installing", after 2007 → Chapter "Voltage Regulator, Removing and Installing, Bosch Generator from 2007".
Overview - Generator, Valeo through MY 2000

1 - Generator
2 - Voltage Regulator
- Removing:
- Remove the nuts -5- and the cover -4-.
- Remove the bolt -6- and the nuts -7- and remove the voltage regulator.
- Carbon brushes wear limit: 5 mm
3 - Protective Cap
4 - Cover
5 - Nut
- 2 Nm
6 - Bolt
- 2 Nm
7 - Nut
- 3.5 Nm
- Quantity: 2
Overview - Valeo Generator from 2001
Note
The generators were implemented as a running change.
1 - Generator
2 - Voltage Regulator
- Removing and installing: to 2007. Refer to → Chapter "Voltage Regulator, Valeo Generator from 2001, Removing and Installing", after 2007 → Chapter "Voltage Regulator, Removing and Installing, Valeo Generator from 2007"
- Check the carbon brushes: to 2007. Refer to → Chapter "Carbon Brushes, Valeo Generator from 2001, Checking", after 2007 → Chapter "Carbon Brushes, Checking, Valeo Generator from 2007"
3 - Bolt
- 2 Nm
4 - Cover
5 - Protective Cap
6 - Bolt
- 2 Nm
READ NEXT:
 Voltage Regulator, Valeo Generator from 2001, Removing and Installing
Removing
- Remove the generator. Refer to
→ Electrical Equipment; Rep. Gr.27; Generator; Generator,
Removing and Installing.
- Press the cover on the rear side of the gene
Ribbed Belt Pulley without Freewheel, Removing and Installing
Special tools and workshop equipment required
Generator Belt Socket -3310-
Inner hex socket 8 mm or TORX
T50
Removing
- Remove the generator if necessary. Refer to
→ Electrical Equipm
Special Tools
Special tools and workshop equipment required
Analog/Digital Multimeter -FLU83III-
Puller - Bevel Gear -T10474-
Torque Wrench 1332 40-200Nm -VAG1332-
Inner Hex Socket 8 mm or TORX T50
B
SEE MORE:
Transmission Control
Component Location Overview - Transmission Control
1 - DSG Transmission Mechatronic -J743-
Removing and installing. Refer to
→ Chapter "Mechatronic, Removing and Installing".
2 - Transmission Fluid Temperature Sensor -G93-
3 - Temperature Sensor In Control M
Audi smartphone interface
Setup
Applies to: vehicles with Audi smartphone interface
You can connect your smartphone to the MMI
with a cable or wirelessly* using the Audi smartphone
interface. Certain content on your smartphone
is adapted in the MMI while driving and
can be operated through the MMI.
Connecting smartphones wit
