Audi A4: Transmission Control
Component Location Overview - Transmission Control
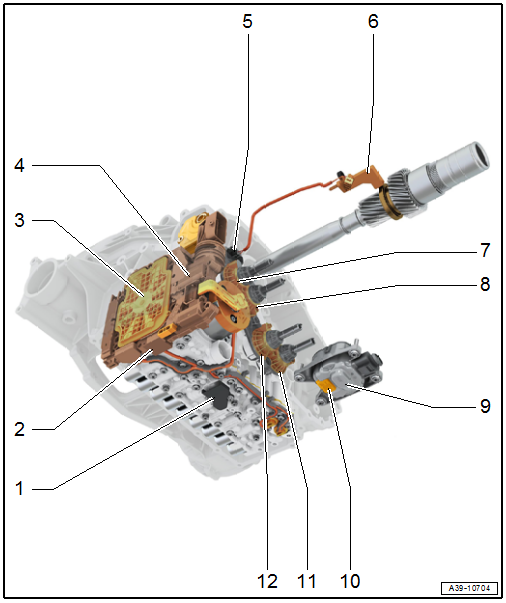
1 - DSG Transmission Mechatronic -J743-
- Removing and installing. Refer to → Chapter "Mechatronic, Removing and Installing".
2 - Transmission Fluid Temperature Sensor -G93-
3 - Temperature Sensor In Control Module -G510-
4 - Transmission Control Module -J217-
5 - Transmission Input Speed Sensor 2 -G612-
6 - Transmission Input Speed Sensor 1 -G632-
7 - Gear Position Distance Sensor 4 -G490-
8 - Gear Position Distance Sensor 3 -G489-
9 - Transmission Electric Pump 2 -V553-
- Removing and installing. Refer to → Chapter "Transmission Fluid Pump, Removing and Installing".
10 - Transmission Fluid Temperature Sensor 2 -G754-
11 - Gear Position Distance Sensor 2 -G488-
12 - Gear Position Distance Sensor 1 -G487-

1 - Transmission Fluid Auxiliary Hydraulic Pump -V552-
2 - Transmission Fluid Auxiliary Hydraulic Pump Rotor Position Sensor -G847-
3 - Drive Position Sensor 2 -G869-
4 - Drive Position Sensor -G676-
5 - Automatic Transmission Pressure Regulating Valve 3 -N217-
6 - Solenoid Valve 4 -N91-
7 - Solenoid Valve 3 -N90-
8 - Solenoid Valve 5 -N92-
9 - Solenoid Valve 6 -N93-
10 - Solenoid Valve 1 -N88-
11 - Solenoid Valve 2 -N89-
12 - Automatic Transmission Pressure Regulating Valve 2 -N216-
13 - Automatic Transmission Pressure Regulating Valve 1 -N215-
14 - Hydraulic Pressure Sensor 1 -G545-
15 - Hydraulic Pressure Sensor 2 -G546-
READ NEXT:
 Seals
Seals
Component Location Overview - Gaskets
1 - Input Shaft Seal
Replacing. Refer to
→ Servicing - 7-Speed Dual Clutch Transmission 0CJ, 0CK, 0CL; Rep.
Gr.39; Seals; Input Sh
Differential
Overview - Differential
1 - Left Flange Shaft Seal
Replacing. Refer to
→ Chapter "Left Seal, Replacing".
2 - Shim
Behind the taper roller bearing outer race
3 -
Center Differential
Overview - Center Differential
1 - O-Ring
Replacing
Coat with transmission fluid
2 - Plug
For the hole for checking and filling
For the transmission fluid inside the transf
SEE MORE:
Selector Mechanism
Overview - Selector Mechanism
Selector Mechanism in the Vehicle Interior
1 - Selector Mechanism
With the following integrated components:
Selector Lever -E313-
Selector Lever Position Sensor -G727-
Transverse Selector Lever Lock Sensor -G868-
Selector Lever Sensor System Control M
Privacy notice
You can find information about responsibility for
data protection in the MMI.
Applies to: MMI: Select on the home screen: SETTINGS
> General > Legal notes > About Audi
connect.
Image recording
Surrounding area monitoring
Applies to: vehicles with surrounding area monitoring
Some vehicle fu
