Audi A4: Ball Joint, Removing and Installing
Special tools and workshop equipment required
- Torque Wrench 1332 40-200Nm -VAG1332-
- Torque Wrench 1332 Insert - Ring Wrench - 21mm -VAG1332/7-
- Ball Joint Splitter -T40277-
 Caution
This procedure contains mandatory replaceable parts. Refer to component overview and parts catalog prior to starting procedure.
Mandatory Replacement Parts
- Bolt - Ball Joint to Wheel Bearing Housing
- Nut - Ball Joint to Control Arm
Removing
- The control arm is removed. Refer to → Chapter "Control Arm, Removing and Installing".
 WARNING
There is a risk of injury from falling components.
When pressing off, the ball joint loosens abruptly from the control arm. Secure the -T40277-.
- Clamp the control arm in a vise with protective covers.
- To protect the threads, remove the nut -arrow- from the joint pin for the ball joint until it is flush with the joint pin threads.
- Press off the ball joint from the control arm using the -T40277-. Do not damage the CV boot while doing this.
- Then remove the nut and the ball joint. If necessary, counterhold on the joint pin with a TX 40 socket to do this.

Installing
Install in reverse order of removal.
Guide Link Bonded Rubber Bushing, Removing and Installing
Special tools and workshop equipment required
- Press Plate -VW402-
- Press Piece - Multiple Use -VW412-
- Bearing Installer - Ball Joint/Bushing/Bearing 2 -VW459/2-
- Bearing Installer - Wheel Bearing -3144-
- Pneumatic Hydraulic Press -VAS6654-
- Installation Lubricant -G 294 421 A1-. Refer to the Parts Catalog.
Bonded Rubber Bushing, Pressing Out
- The guide link is removed. Refer to → Chapter "Guide Link, Removing and Installing"
- Mark the press-in depth -arrow- on the bonded rubber bushing -4-, for example using a waterproof felt-tip pen.
- Arrange the special tools as shown.
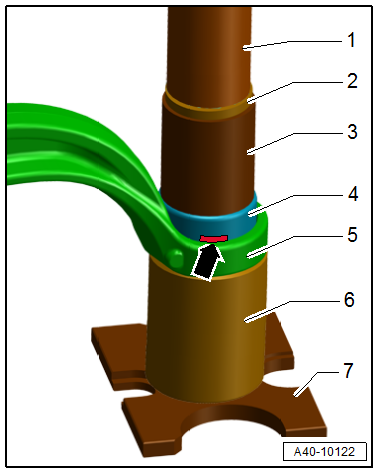
1 - -VAS6654- Punch
2 - -VW412-
3 - -VW459/2-
4 - Bonded Rubber Bushing
5 - Guide Link
6 - -3144-
7 - -VW402-
 Note
Note
Hold the guide link firmly in position while pressing the bonded rubber bushing out and in.
- Remove the bonded rubber bushing from the guide link.
Bonded Rubber Bushing, Pressing In
- Transfer the mark for the press-in depth from the old bonded rubber bushing to the new one.
- Apply a thin coat of Installation Lubricant -G 294 421 A1- to the new bonded rubber bushing.
Bonded rubber bushing installation position:
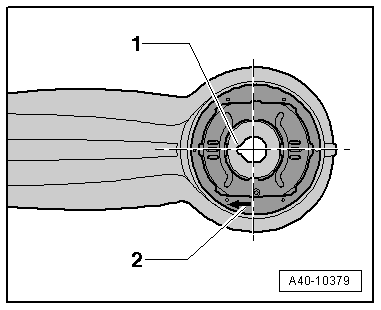
- The notch -1- is on the steering axle and faces inward to the guide link.
- The arrow -2- points inward to the guide link.
- Insert the bonded rubber bushing in the guide link. Pay attention to the installation position.
- Arrange the special tools as shown.
1 - -VAS6654- Punch
2 - -VW412-
3 - -VW459/2-
4 - Bonded Rubber Bushing
5 - Guide Link
6 - -3144-
7 - -VW402-
- Press the bonded rubber bushing in the guide link, and do not tilt it.
- Pay attention to the mark -arrow- for the press-in depth.
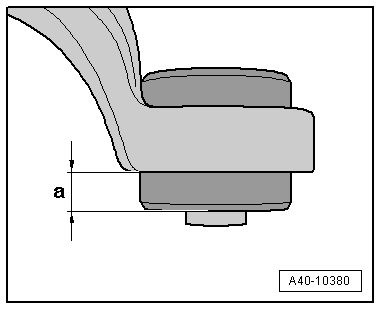
- Check the press-in depth -a- of the bonded rubber bushing in the guide link.
- Dimension -a- = 23 mm.
- If the value is not reached, press in the bonded rubber bushing again.
READ NEXT:
 Overview - Wheel Bearing
1 - Wheel Bearing Housing
Removing and installing. Refer to
→ Chapter "Wheel Bearing Housing, Removing and Installing".
2 - Bolt
80 Nm + 90º
Replace after removing
Wheel Bearing Housing, Removing and Installing
Special tools and workshop equipment required
Spreader Tool -3424-
Torque Wrench 1332 40-200Nm -VAG1332-
Engine and Gearbox Jack -VAS6931-
Ball Joint Splitter -VAS251805-, not illustrated
Puller
SEE MORE:
Exterior Lights, Switches
HID Headlamp Usage and Safety Precautions
Never replace bulbs if you are not familiar with the
procedures, safety precautions and tools.
WARNING
Danger to life due to high voltage.
For work on the yellow high voltage symbol marked
areas HID headlamp must be de-energized.
Turn off the i
Wheel Bearing Unit, Removing and Installing
Wheel Bearing Unit, Removing and Installing, FWD
Special tools and workshop equipment required
Puller - Grease Cap -VW637/2-
Camshaft Installer Kit - Sleeve -3241/4- from the Seal
Installer - Camshaft Installer Kit -3241-
Torque Wrench 1332 40-200Nm -VAG1332-
Torque Wrench 1410 -VAG1410-
&n
