Audi A4: Door Arrester, Removing and Installing
Removing
- Tape off the B-pillar in the door arrester area using adhesive tape, so that the paint will not be damaged.
- Move the door window into the "closed" position.
- Remove the rear door trim panel. Refer to → Body Interior; Rep. Gr.70; Rear Door Trim Panels; Rear Door Trim Panel, Removing and Installing.
- Remove the speaker. Refer to → Communication; Rep. Gr.91; Sound System; Component Location Overview - Sound System.
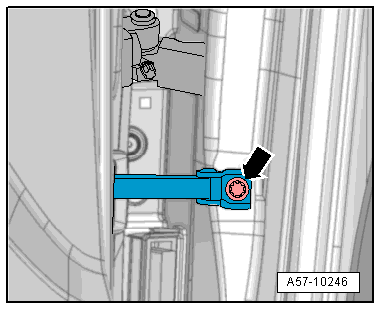
- Remove the door arrester bolt -arrow-.
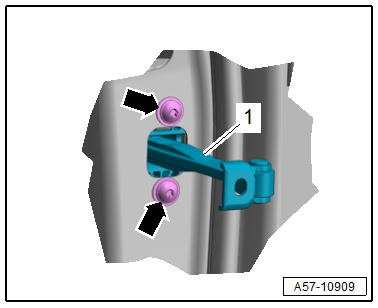
- Remove the bolts -arrows- and remove the door arrester -1- toward the inside.
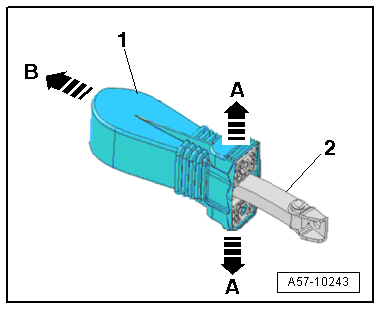
- Pull the cap -1- slightly to the side in the direction of -arrows A- and remove it from the door arrester -2- in the direction of -arrow B-.
Installing
Install in reverse order of removal and note the following:
- Door arrester installation position. Refer to → Fig. "Door Arrester Installation Position".
- Cap installation position. Refer to → Fig. "Cap Installation Position".
Tightening Specifications
- Refer to → Chapter "Overview - Door"
Inner Door Seal, Removing and Installing
Removing
- Remove the rear sill panel. Refer to → Body Interior; Rep. Gr.70; Vehicle Interior Trim Panels.
- Remove the B-pillar trim panels. Refer to → Body Interior; Rep. Gr.70; Vehicle Interior Trim Panels.
- Remove the C-pillar trim panel. Refer to → Body Interior; Rep. Gr.70; Vehicle Interior Trim Panels.
- Remove the inner door seal from the body flange.
Installing
Install in reverse order of removal and note the following:
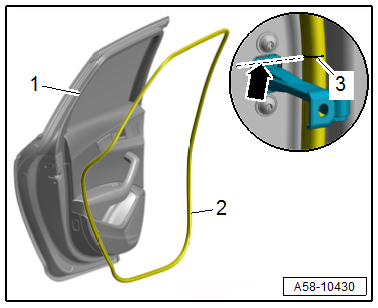
- Place the inner door seal -1- with the vulcanized point -3- centered to the door arrester -2- on the body flange and push it on all around.

Outer Door Seal, Removing and Installing
- The following components must be replaced after removal. Refer to → Chapter "Overview - Door Seals".
Special tools and workshop equipment required
- Roller -3356-
- Adhesive Strip Remover -VAS6349-
- Cleaning Solution -D 009 401 04-
- Applicator -D 009 500 25-
- Bonding Agent -D 355 205 A2-
Removing
- Remove the rear window frame trim panel. Refer to → Body Interior; Rep. Gr.70; Rear Door Trim Panels.
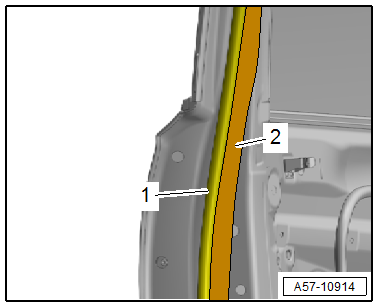
- Mark the position of the outer door seal -1- all around with adhesive tape -2-.
- Tape off the B-pillar in the door arrester area using adhesive tape, so that the paint will not be damaged.
- Remove the door arrester bolt -arrow-.
- Pull the outer door seal -1- slightly away from the top of the door frame and cut it with commercially available scissors.
- Gradually stretch the outer door seal lengthwise in the direction of -bottom arrow- and remove it in the direction of -upper arrow-.
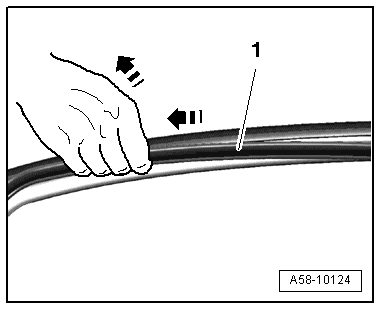
TIP
Pulling the outer door seal lengthwise will loosen the outer door seal adhesive and then it is possible to remove it from the door without any adhesive residue.
- Remove the outer door seal completely.
Installing
Install in reverse order of removal and note the following:
- The vehicle and the seal must be at room temperature.
- The adhesive surfaces must be free of dirt and grease.
- If the Bonding Agent -D 355 205 A2- dries longer than 3 hours, then it must be primed again.
- Do not stretch the seal when installing it.
- So that the outer door seal does not loosen or slide, do not close the door for two hours.
- Remove the adhesive residue using -VAS6349-.
- Clean the adhesive surface on the door with Cleaning Solution -D 009 401 04-.
- Apply Bonding Agent -D 355 205 A2- on the adhesive surface of the door using the Applicator -D 009 500 25- and let it dry.
- Remove the protective film from the adhesive tape.
- Position the outer door seal -2- with the vulcanized point -3- centered to the door arrester opening -arrow- on the door body -1- and bond it all around. At the same time, pay attention to the installation position of the previously installed adhesive tape.
- When the outer door seal is positioned correctly, the drain holes in the seal are at the bottom.
- Press the seal on using the -3356-.
- Resting time of the vehicle is a minimum of two hours with the doors open at room temperature.
READ NEXT:
 Door Components
Overview - Window Regulator
1 -
Nut
7.5 Nm
2 -
Window Regulator
Removing and installing. Refer to
→ Chapter "Window Regulator, Removing and Installing".
3 -&nbs
Window Regulator, Removing and Installing
Removing
- Remove the rear door window. Refer to
→ Chapter "Rear Door Window, Removing and Installing".
- Release the retainers -3 and 4- on
the threaded pins -5- for the
window re
Door Handle, Removing and Installing
Removing
- Remove the door handle trim. Refer to
→ Chapter "Door Handle Trim, Removing and Installing".
- If equipped, remove the exterior door handle illumination bulb.
Refer to
â
SEE MORE:
Front Backrest, Removing and Installing
Front Backrest, Removing and Installing
Special tools and workshop equipment required
Engine/Transmission Holder - Seat Repair Fixture -VAS6136-
Caution
This procedure contains mandatory replaceable parts.
Refer to component overview and parts catalog prior to
starting procedure.
Manda
Center Differential
Overview - Center Differential
1 - O-Ring
Replacing
Coat with transmission fluid
2 - Plug
For the hole for checking and filling
For the transmission fluid inside the transfer case
Tightening Specification.
3 - Center Differential Housing
Removing and instal
