Audi A4: Window Regulator, Removing and Installing
Removing
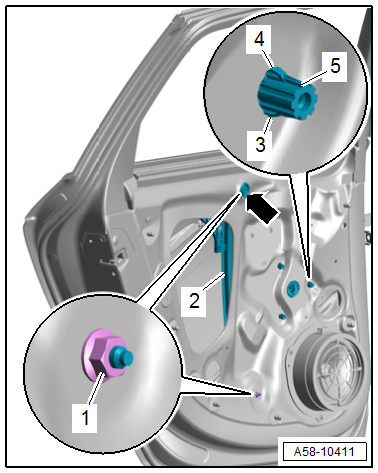
- Remove the rear door window. Refer to → Chapter "Rear Door Window, Removing and Installing".
- Release the retainers -3 and 4- on the threaded pins -5- for the window regulator using an 11 mm socket. To do so, slide the socket onto the threaded pin.
- Remove the plug -arrow-.
- Loosen the upper nuts -1- three turns, and remove the lower nuts.
- Pull the window regulator -2- toward the rear and out of the door inner cover opening.
Installing
Install in reverse order of removal and note the following:
- The clips for the window regulator threaded pins must be engaged into the inner door panel.
Tightening Specifications
- Refer to → Chapter "Overview - Window Regulator"
Window Regulator Motor, Removing and Installing
Removing
TIP
The window regulator motor can be removed or installed with the motor or door window in any position.
- Remove the rear door trim panel. Refer to → Body Interior; Rep. Gr.70; Rear Door Trim Panels; Rear Door Trim Panel, Removing and Installing.
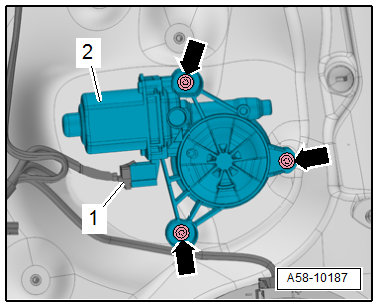
- Disconnect the connector -1-.
- Remove the bolts -arrows- and remove the window regulator motor -2- from the window regulator.
Installing
Install in reverse order of removal and note the following:
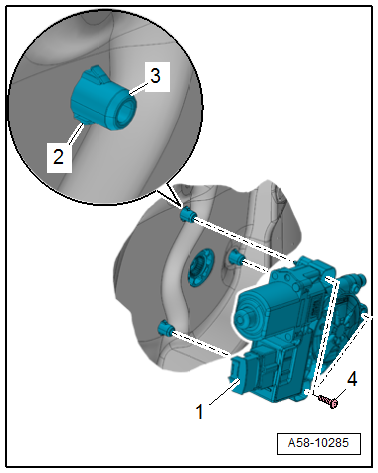
- The clips -2- for the window regulator threaded pins -3- must be engaged in the inner door panel.
- Slide the window regulator motor -1- onto the threaded pins and tighten the bolts -4-.
Tightening Specifications
- Refer to → Chapter "Overview - Window Regulator"
READ NEXT:
 Door Handle, Removing and Installing
Removing
- Remove the door handle trim. Refer to
→ Chapter "Door Handle Trim, Removing and Installing".
- If equipped, remove the exterior door handle illumination bulb.
Refer to
â
Door Lock Cable, Removing and Installing
NOTICE
Risk of damaging the operating cable by deforming it.
- Never sharply bend or kink the operating cable.
Removing
- Remove the door window guide rail. Refer to
→ Chapte
Window Guide, Removing and Installing
Removing
- Remove the window frame trim panel. Refer to
→ Body Interior; Rep. Gr.70; Rear Door Trim Panels; Window Frame
Trim Panel, Removing and Installing.
- Remove the B
SEE MORE:
Operating Audi adaptive cruise control
Applies to: vehicles with Audi adaptive cruise control
Fig. 110 Operating lever: operating adaptive cruise control
Fig. 111 Operating lever: changing the speed
Switching on
To switch on the adaptive cruise control, pull
the lever up to position 1 until it engages.
Storing the speed and activat
Effects Speaker, Removing and Installing
Left and Right Effects Speaker -R209-/-R210-, Removing and Installing,
Sedan
Special tools and workshop equipment required
Trim Removal Wedge -3409-
The Left Effects Speaker -R209-/Right Effects Speaker -R210-
are located in the rear shelf.
Removing and installing is identical.
Removing
-
