Audi A4: Electric Coolant Pump, Removing and Installing
Coolant Recirculation Pump -V50-, Removing and Installing
Special tools and workshop equipment required
- Hose Clamps - Up To 25mm -3094-
- Hose Clip Pliers -VAS6340-
Removing
- Remove the engine cover. Refer to → Servicing - 4-Cylinder 2.0L 4V TFSI Engine; Rep. Gr.10; Engine Cover; Engine Cover, Removing and Installing.
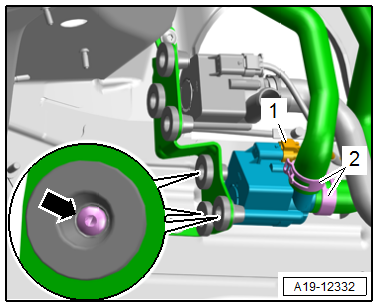
- Disconnect the connector -1-.
 Note
Note
Place a cloth underneath to catch any escaping coolant.
- Loosen the hose clamps -2- to clamp off the coolant hoses with the -3094- and remove them.
- Remove the bolts -arrows- and the Coolant Recirculation Pump -V50-.
Installing
Install in reverse order of removal and note the following:
Note
- Secure all hose connections with hose clamps that match the ones used in series production. Refer to the Parts Catalog.
- Used coolant cannot be used again.
- Fill with coolant. Refer to → Chapter "Coolant, Draining and Filling".
- Install the engine cover. Refer to → Servicing - 4-Cylinder 2.0L 4V TFSI Engine; Rep. Gr.10; Engine Cover; Engine Cover, Removing and Installing.
Tightening Specifications
- Refer to → Chapter "Overview - Electric Coolant Pump"
After-Run Coolant Pump -V51-, Removing and Installing
Special tools and workshop equipment required
- Hose Clamps - Up To 25mm -3094-
- Hose Clip Pliers -VAS6340-
Removing
- Remove the engine cover. Refer to → Servicing - 4-Cylinder 2.0L 4V TFSI Engine; Rep. Gr.10; Engine Cover; Engine Cover, Removing and Installing.
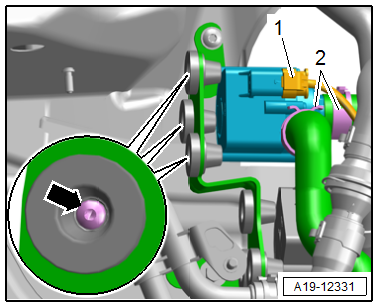
- Disconnect the connector -1-.
Note
Place a cloth underneath to catch any escaping coolant.
- Loosen the hose clamps -2- to clamp off the coolant hoses with the -3094- and remove them.
- Remove the bolts -arrows- and the After-Run Coolant Pump -V51-.
Installing
Install in reverse order of removal and note the following:
Note
- Secure all hose connections with hose clamps that match the ones used in series production. Refer to the Parts Catalog.
- Used coolant cannot be used again.
- Fill with coolant. Refer to → Chapter "Coolant, Draining and Filling".
- Install the engine cover. Refer to → Servicing - 4-Cylinder 2.0L 4V TFSI Engine; Rep. Gr.10; Engine Cover; Engine Cover, Removing and Installing.
Tightening Specifications
- Refer to → Chapter "Overview - Electric Coolant Pump"
READ NEXT:
 Coolant Pump, Removing and Installing
Removing
- Remove the engine cover. Refer to
→ Servicing - 4-Cylinder 2.0L 4V TFSI Engine; Rep. Gr.10; Engine
Cover; Engine Cover, Removing and Installing.
- Drain the coo
Radiator/Radiator Fan
Overview - Radiator/Radiator Fan
1 - Radiator
Removing and installing. Refer to
→ Chapter "Radiator, Removing and Installing".
After replacing, replace entire amount of coolant
Radiator, Removing and Installing
Special tools and workshop equipment required
Coolant Collection System -VAS5014- or Shop Crane - Drip
Tray -VAS6208-
Elbow Assembly Tool -T10118-
Caution
This procedure contains mandato
SEE MORE:
Shock Absorber Leaks
Vehicles with Coil Springs
Shock absorbers are frequently rejected and replaced because
of leaks. Examinations on the test stand and on the vehicle have
shown that the replacement of a large number of rejected shock
absorbers was not justified.
Slight leaking of oil ("sweating") at piston rod sea
Driver Side Airbag
Overview - Driver Side Airbag
1 - Wiring Harness
For Driver Airbag Igniter -N95- and Driver Airbag Release Valve Igniter
-N490-
Replacing. Refer to
→ Chapter "Airbag Connector, Replacing".
2 - Steering Column Electronics Control Module -J527-
Overview. Refer to
â
