Audi A4: Wheel Bearing Unit, Removing and Installing
Wheel Bearing Unit, Removing and Installing, FWD
Special tools and workshop equipment required
- Puller - Grease Cap -VW637/2-
- Camshaft Installer Kit - Sleeve -3241/4- from the Seal Installer - Camshaft Installer Kit -3241-
- Torque Wrench 1332 40-200Nm -VAG1332-
- Torque Wrench 1410 -VAG1410-
 Caution
This procedure contains mandatory replaceable parts. Refer to component overview and parts catalog prior to starting procedure.
Removing
- Remove the brake rotor. Refer to → Brake System; Rep. Gr.46; Rear Brakes; Brake Rotor, Removing and Installing.
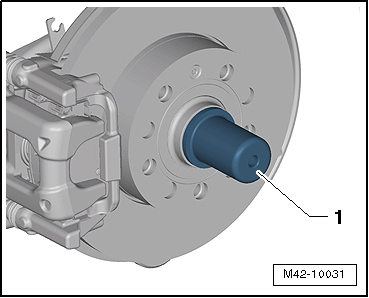
- Loosen the dust cap from the seat by tapping lightly on claw of the -VW637/2- with the hammer.
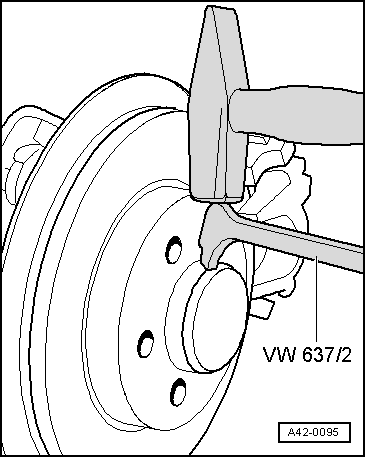
- Press the dust cap off using the -VW637/2--1-.
Caution
There is a risk of damaging the threads.
The bolt must not be loosened or tightened with an impact wrench.
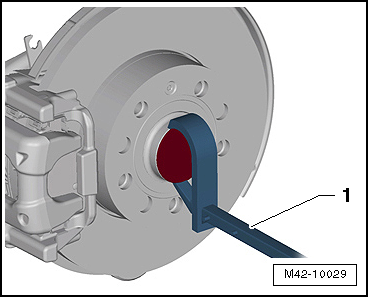
- Remove the bolt -arrow- and remove the wheel bearing unit -1- from the axle stub.
- Handling the wheel bearing. Refer to → Fig. "Wheel Bearing, Handling".
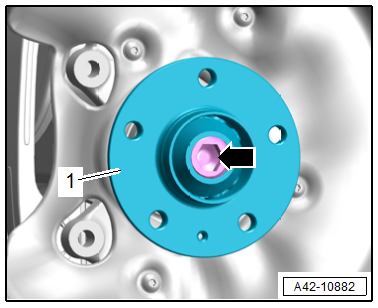
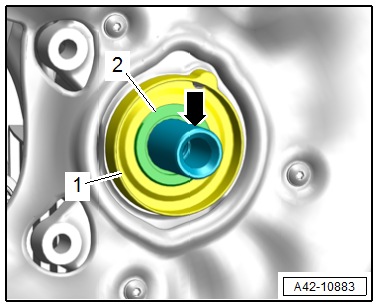
- Remove the metal washer -2- and front seal -1- from the axle stub -arrow-.
Installing
 Note
Note
Replace the bolt and dust cap after removal.
- Apply the front seal -1-.
- Lightly lubricate the metal washer -2- and the axle stub -arrow- with grease.
- Carefully slide the wheel bearing unit on the axle stub and do not tilt while doing so.
Further installation is performed in reverse order of removal, while noting the following:
Caution
There is a risk of premature wear on the wheel bearing.
Use the tools pictured to avoid any moisture entering through a damaged dust cap.
- Drive in the new dust cap all the way using the -3241/4--1-.
Tightening Specifications
- Refer to → Chapter "Overview - Wheel Bearing, FWD"
Wheel Bearing Unit, Removing and Installing, AWD
Special tools and workshop equipment required
- Torque Wrench 1332 40-200Nm -VAG1332-
- Torque Wrench 1410 -VAG1410-
Caution
This procedure contains mandatory replaceable parts. Refer to component overview and parts catalog prior to starting procedure.
Mandatory Replacement Parts
- Bolt - Wheel Bearing to Wheel Bearing Housing
Removing
- Loosen the connection between the drive axle and wheel hub. Refer to → Chapter "Drive Axle Threaded Connection, Loosening and Tightening".
- Remove the brake rotor. Refer to → Brake System; Rep. Gr.46; Rear Brakes; Brake Rotor, Removing and Installing.
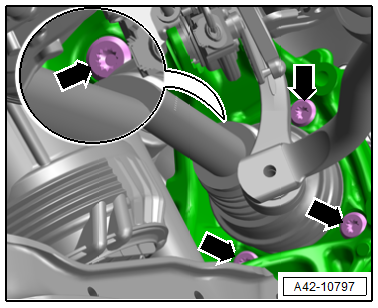
- Remove the expanding rivets -2-.
- Pull the wind deflector -1- slightly outward in the direction of the -arrow- and remove.

- Remove the bolts -arrows- in stages, and remove the wheel bearing unit from the drive axle and the wheel bearing housing at the same time.
- Handling the wheel bearing. Refer to → Fig. "Wheel Bearing, Handling".
Installing
Install in reverse order of removal and note the following:
- Tighten the threaded connection between the drive axle and wheel hub. Refer to → Chapter "Drive Axle Threaded Connection, Loosening and Tightening".
Tightening Specifications
- Refer to → Chapter "Overview - Wheel Bearing, AWD"
READ NEXT:
 Wheel Bearing Unit, Servicing
Note
The wheel bearing and wheel hub are currently only delivered
together. As soon as these components are delivered separately,
the following instructions will apply.
Special tools and wor
Overview - Drive Axle
1 - Cap
Carefully drive off using a drift
Replace if damaged
Adhesive surface must be free of oil and grease
Coat the sealing surface with Sealant -D 454 300 A2- before installing on
SEE MORE:
Cylinder Block, Belt Pulley Side
Overview - Cylinder Block, Belt Pulley Side
All components are described under:
→ Servicing - 4-Cylinder 2.0L 4V TFSI Engine; Rep. Gr.13; Cylinder Block Belt
Pulley Side; Overview - Cylinder Block Belt Pulley Side.
Ribbed Belt, Removing and Installing
All procedures are described
Driver Assistance Systems Front Camera
Driver Assistance Systems Front Camera, Calibrating
Special tools and workshop equipment required
Vehicle Diagnostic Tester
Wheel Alignment Computer
Setting Device Basic Set -VAS6430-
Setting Device - Basic Set -VAS6430/1A-
Requirements
The -VAS6430/1A- must be set and locked in the center
