Audi A4: Inner CV Joint, Checking
It is necessary to disassemble the joint whenever replacing the grease or if the ball surfaces show wear or damage.
Disassembling
 Note
Note
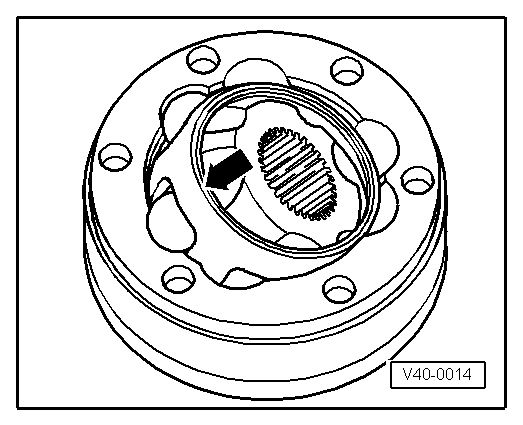
Ball hub and joint are paired and should be identified before removal. Do not interchange ball race allocation.
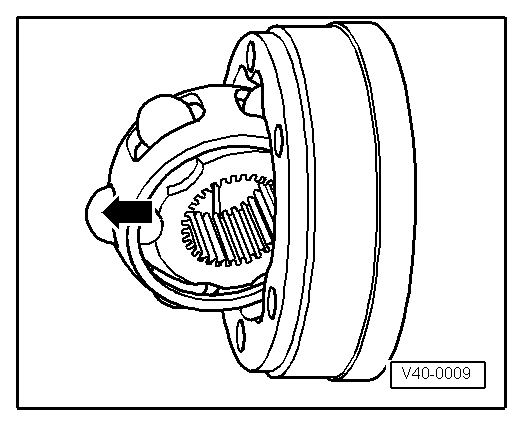
- Tilt the ball hub and ball cage.
- Remove the joint in the direction of the -arrow-.
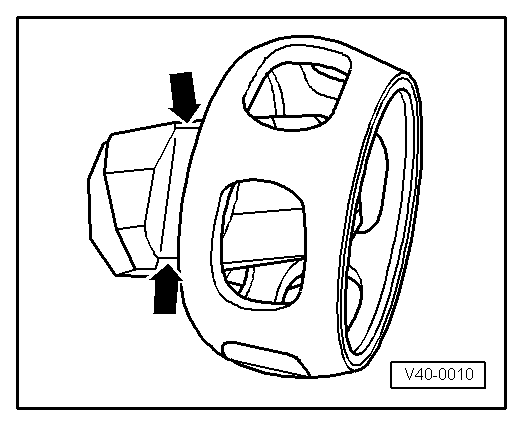
- Remove the balls from the cage.
- Flip out ball hub from ball cage via the ball race -arrows-.
- Check the joint, ball hub, ball cage and balls for small broken off depressions (pitting) and chafing.
Note
Excessive backlash in joint will be noticed as a knock during load changes. Joint must be replaced in such cases. Flattening and running marks on the balls are no reason to replace the joint.
Assembling
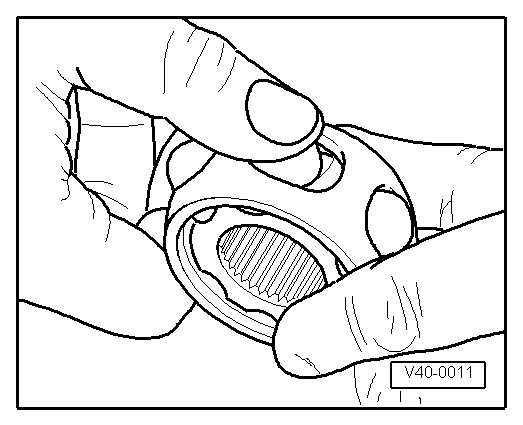
- Insert the ball hub into the ball cage via two chamfers. The installation position is arbitrary. Press balls into cage.
- Insert hub with cage and balls upright into joint piece.
- When inserting, make sure that in each case the wide gap -a- at joint piece contacts narrow gap -b- at hub after swinging in.
- Chamfer on inner diameter of wheel hub (splines) must face toward drive axle.
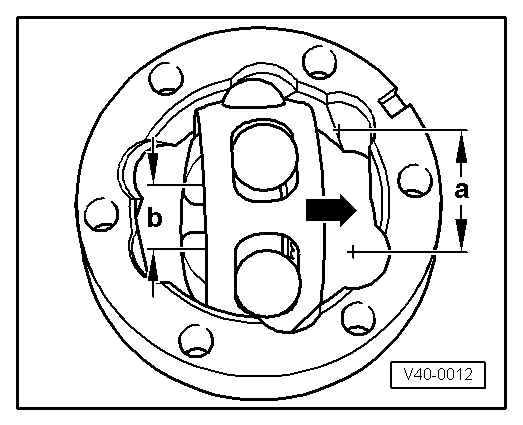
- Swing in ball hub, to do so swing out hub far enough from cage -arrows- so that the balls have the distance of the races.

- Swing in hub with balls by pressing forcefully onto cage -arrow-.
Check the CV Joint Function
The CV joint is properly assembled, if the ball hub can be slid back and forth by hand over the entire length adjustment.
- Press grease into joint body.
Grease quantities and types, drive axle with inner CV joint.
READ NEXT:
 Special Tools
Special tools and workshop equipment required
Engine/Gearbox Jack Adapter - Wheel Hub Support -T10149-
Hydraulic Press - Bushing Assembly Tool Kit -T10230-
Gearbox Support -T40173-
Pulle
Electronic Damping
Component Location Overview - Electronic Damping
1 - Front Level Control System Sensor
Left Front Level Control System Sensor -G78-
Right Front Level Control Sensor -G289-
Overview. R
SEE MORE:
Component Location Overview - Infotainment System
1 - Bracket
2 - Information Electronics Control Module 1 -J794-
Connector assignment. Refer to
→ Wiring diagrams, Troubleshooting & Component locations.
Removing and installing. Refer to
→ Chapter "Information Electronics Control Module 1 -J794-, Removing
Child safety seats
General information
When installing and using child safety seats, follow
the information in this Owner's Manual, the
applicable state and federal regulations, and the
manufacturer instructions for the child safety
seat.
WARNING
To reduce the risk of serious or fatal injuries,
children must always be
