Audi A4: Selector Lever Handle, Removing and Installing
 Note
Note
Both the selector lever handle and the selector lever boot are removed together.
Special tools and workshop equipment required
- Trim Removal Wedge -3409-
- Torque Wrench 1410 - VAG1410-
Removing
- Ignition switched off.
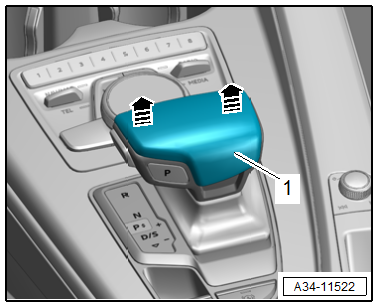
- Remove the selector lever handle upper section -1- upward in direction of -arrows-.
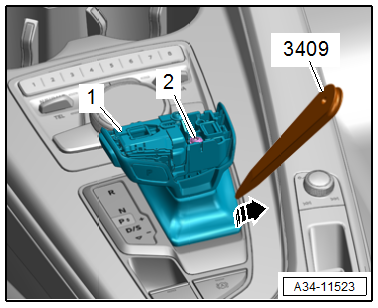
- Carefully pry out the selector lever boot on the side using the Trim Removal Wedge -3409- in direction of -arrow-.
- Remove the bolt -2-.
- Pull the selector lever handle lower section -1- upward.
Installing
Install in the reverse order of removal while noting the following:
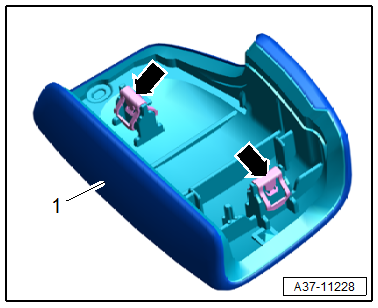
- Check the clips -arrows- on the bottom of the selector lever handle upper section -1- are seated correctly, and if necessary press them in farther.
- Attach the selector lever handle upper section to the selector lever handle lower section.
- Clip in the selector lever boot on the Selector Lever Transmission Range Display -Y5-.
- Check the selector mechanism. Refer to → Chapter "Gearshift Mechanism, Checking".
Tightening Specifications
- Refer to → Chapter "Overview - Selector Mechanism"
Selector Lever Boot on Selector Lever Handle, Disconnecting and Assembling
Separating
- Remove the selector lever handle. Refer to → Chapter "Selector Lever Handle, Removing and Installing".
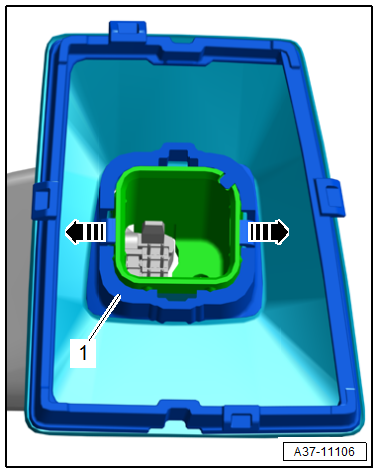
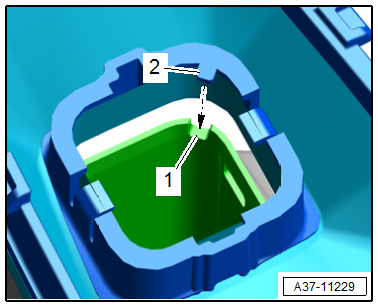
- Release the catches in direction of -arrows- and remove the selector lever boot -1- from the selector lever handle.
Assembling
- Push the selector lever boot until it engages audibly on the selector lever handle.
- The tab -2- on the selector lever boot must engage in the opening -1- in the selector lever handle in direction of -arrow-.
- Install the selector lever handle. Refer to → Chapter "Selector Lever Handle, Removing and Installing".
Selector Mechanism, Removing and Installing
Special tools and workshop equipment required
- Torque Wrench 1410 - VAG1410-
Removing
- Remove the selector lever handle. Refer to → Chapter "Selector Lever Handle, Removing and Installing".
- Remove the center console insert. Refer to → Body Interior; Rep. Gr.68; Center Console; Center Console, Removing and Installing.
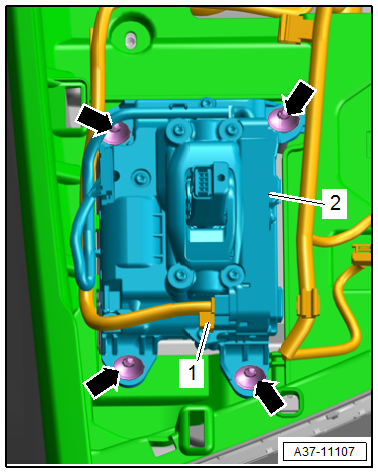
- Disconnect the connector -1-.
- Remove the bolts -arrows- and remove the selector mechanism -2-.
Installing
Install in the reverse order of removal while noting the following:
- Install the center console insert. Refer to → Body Interior; Rep. Gr.68; Center Console; Center Console, Removing and Installing.
- Install the selector lever handle. Refer to → Chapter "Selector Lever Handle, Removing and Installing".
- Check the selector mechanism. Refer to → Chapter "Gearshift Mechanism, Checking".
Tightening Specifications
- Refer to → Chapter "Overview - Selector Mechanism"
READ NEXT:
 Parking Lock Emergency Release Cable, Removing and Installing
Removing
WARNING
There is a risk of an accident from the vehicle
starting to roll.
Pull the parking brake button to activate the
electro-mechanical parking brake.
- Remove the selector
Transmission, Removing
Special tools and workshop equipment required
Hose Clamps - Up To 25 mm -3094-
Torque Wrench 1332 Insert - Ring Wrench - 16mm -VAG1332/14-
Engine and Gearbox Jack -VAS6931-
Torque Wrench Adapter
Transmission, Installing
Special tools and workshop equipment required
Clutch Module Assembly Aid -T40169-
Clutch Module Transportation Lock -T40170-
As well as all the special tools listed for the removal.
Procedure
&
SEE MORE:
Guide Link, Removing and Installing
Special tools and workshop equipment required
Torque Wrench 1332 40-200Nm -VAG1332-
Torque Wrench 1332 Insert - Ring Wrench - 21mm -VAG1332/7-
Engine and Gearbox Jack -VAS6931-
Puller - Ball Joint -T40043-
Caution
This procedure contains mandatory replaceable parts.
Refer to componen
Head restraints
General information
Applies to: vehicles with adjustable head restraints
Fig. 61 Correctly-adjusted head restraint
Make sure that:
The upper edge of the head restraint is as even
as possible with the top of your head
The head restraint is as close as possible to the
back of the head
The head
