Audi A4: Transmission Fluid Pan, Removing and Installing
Special tools and workshop equipment required
- Engine Bung Set -VAS6122-
- Used Oil Collection and Extraction Unit -SMN372500-
Removing
 Note
Note
- General repair instructions. Refer to → Chapter "Repair Information".
- Guidelines for clean working conditions when working on the dual-clutch transmission. Refer to → Chapter "Rules for Cleanliness When Working on DSG Transmission".
 WARNING
The system is under pressure.
- Deactivate the ATF pump and drain the hydraulic pressure reservoir before removing the transmission fluid pan!
- Refer to → Chapter "ATF Pump, Deactivating and Draining the Hydraulic Pump Reservoir".
 Caution
Risk of damaging the transmission.
Do not run engine or tow vehicle when the transmission fluid pan is removed or without transmission fluid.
- Remove the subframe crossbrace. Refer to → Suspension, Wheels, Steering; Rep. Gr.40; Subframe; Subframe Crossbrace, Removing and Installing.
- Using the Vehicle Diagnostic Tester in the Transmission Control Module -J217- empty the ATF pressure reservoir and disable the Transmission Fluid Auxiliary Hydraulic Pump -V552-. Refer to → Chapter "ATF Pump, Deactivating and Draining the Hydraulic Pump Reservoir".
- Drain the ATF. Refer to → 7-Speed Dual Clutch Transmission 0CK; Rep. Gr.34; ATF; ATF, Draining and Filling.
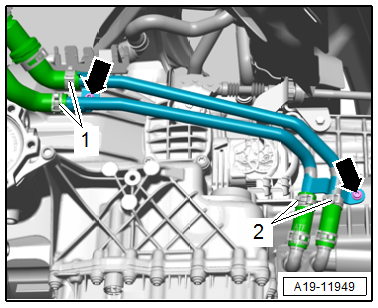
- Remove the bolts -arrows-.
Note
The coolant hose -2- stays connected to the ATF cooler.
- Remove the bolts -arrows- and remove the protective plate -1-.
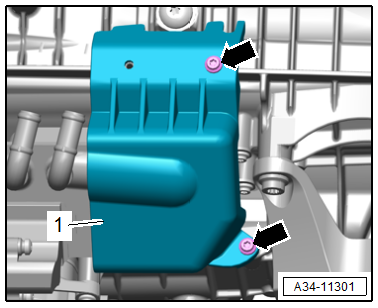
- Place the Used Oil Collection and Extraction Unit -SMN372500- underneath.
- Only loosen bolts -2- and remove the bolts -1 and 3-.
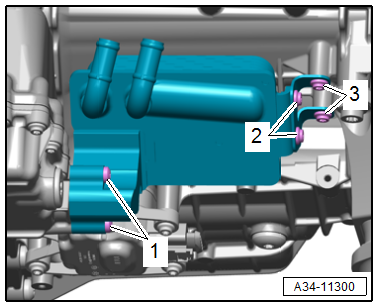
- Remove the ATF cooler -2- from the transmission fluid pan and hang it to the side. Make sure that the ATF line -1- stays installed in the transmission fluid pan while doing this.
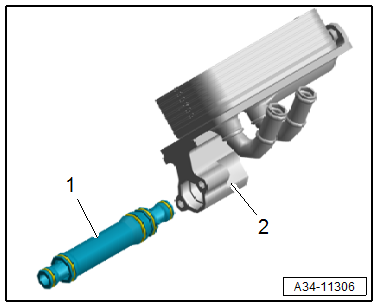
- Remove the ATF line -1- from the transmission fluid pan.
- Seal the open lines and connections with clean plugs from the Engine Bung Set -VAS6122-.
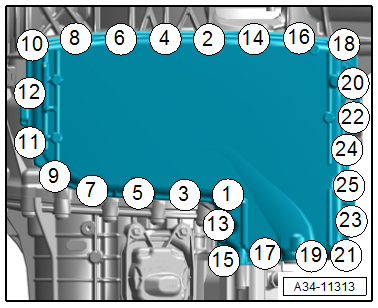
- Remove the bolts in the sequence -25 to 1- and remove the transmission fluid pan.
Installing
Install in the reverse order of removal while noting the following:
Note
Replace the seal and the ATF line.
Note
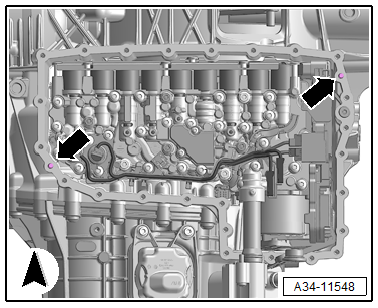
- For vehicles with an aluminum oil pan a plastic oil pan is available as a replacement part.
- During the conversion both the centering pins -arrow- must be removed from the transmission housing.
- At the same time pay attention that the sealing surface is not damaged.
- Install the ATF cooler. Refer to → 7-Speed Dual Clutch Transmission 0CK; Rep. Gr.34; ATF Circuit; ATF Cooler, Removing and Installing.
- Fill the ATF. Refer to → 7-Speed Dual Clutch Transmission 0CK; Rep. Gr.34; ATF; ATF, Draining and Filling.
Tightening Specifications
- Refer to → Fig. "Transmission Fluid Pan - Tightening Specification and Sequence"
- Subframe crossbrace. Refer to → Suspension, Wheels, Steering; Rep. Gr.40; Subframe; Subframe Crossbrace, Removing and Installing.
READ NEXT:
 Mechatronic, Removing and Installing
Special tools and workshop equipment required
Used Oil Collection and Extraction Unit -SMN372500-
Assembly Tool -T40305-
Oil Sump Assembly Pin -T40199-
Electronic Torque Wrench 3-60Nm -VAS6583-
Transmission Control Module -J217-, Removing and Installing
Removing
WARNING
The system is under pressure.
The electronic ATF pump must be deactivated every
time before opening the transmission, and the hydraulic
pressure reservoir is drained.
Re
Hydraulic Pressure Sensor 1 -G545- and Hydraulic Pressure Sensor 2 -G546-,
Removing and Installing
Note
The Mechatronic remains installed.
WARNING
The system is under pressure.
The electronic ATF pump must be deactivated every
time before opening the transmission, and the hydrau
SEE MORE:
Traffic incidents
Introduction
Applies to: vehicles with navigation system and online traffic
information
Fig. 147 traffic information overview
Open traffic information
Requirement: the map must be displayed.
Press on the traffic jam symbol in the side
menu on the map fig. 143.
Display traffic report details
P
Drive Axle, Disassembling and Assembling
Drive Axle, Disassembling and Assembling, Triple Roller Joint AAR 2600 i
and AAR 3300 i
Special tools and workshop equipment required
Press Plate -VW401-
Press Plate -VW402-
Press Piece - Rod -VW408A-
Press Piece - Rod -VW411-
Press Piece - 31.5mm -VW416B-
Press Piece - Multiple Use -VW447H-
