Audi A4: Component Location Overview - Antenna Systems
Component Location Overview - Antenna Systems, Sedan, USA
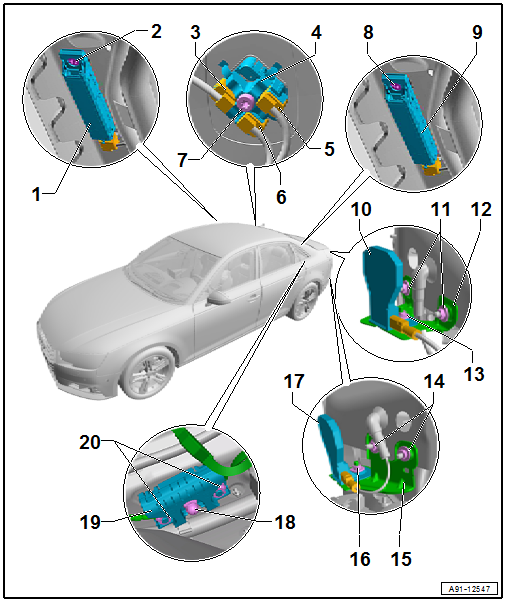
1 - Antenna Amplifier -R24-
- Removing and Installing. Refer to → Chapter "Antenna Amplifier -R24-, Removing and Installing, Sedan".
TV Antenna Amplifier 1 -R82-
- Removing and Installing. Refer to → Chapter "TV Antenna Amplifier 1 -R82-, Removing and Installing, Sedan".
2 - Bolt
- 2 Nm
3 - SAT Connection for the Satellite Antenna -R170-
4 - Roof Antenna -R216-
- Removing and Installing. Refer to → Chapter "Roof Antenna, Removing and Installing".
5 - GPS Connection from GPS Antenna -R50-
6 - GSM Connection from Telephone Antenna -R65-
LTE Connection from LTE Antenna 2 -R306-
7 - Bolt
- 5 Nm
8 - Bolt
- 2 Nm
9 - Antenna Amplifier 2 -R111-
- Removing and Installing. Refer to → Chapter "Antenna Amplifier 2 -R111-, Removing and Installing, Sedan".
TV Antenna Amplifier 2 -R83-
- Removing and Installing. Refer to → Chapter "TV Antenna Amplifier 2 -R83-, Removing and Installing, Sedan".
10 - LTE Antenna 2 -R306-
- Removing and Installing. Refer to → Chapter "Bumper Antennas, Removing and Installing".
11 - Nut
- 3 Nm
- Quantity: 2
12 - Bracket
13 - Nut
- 3 Nm
14 - Nut
- 3 Nm
- Quantity: 2
15 - Bracket
16 - Nut
- 3 Nm
17 - LTE Antenna 1 -R297-
- Removing and Installing. Refer to → Chapter "Bumper Antennas, Removing and Installing".
18 - Nut
- 9 Nm
19 - Windshield Antenna Suppression Filter -C18-
- Removing and Installing. Refer to → Chapter "Windshield Antenna Suppression Filter -C18-, Removing and Installing, Sedan".
20 - Nut
- 9 Nm
- Quantity: 2
Component Location Overview - Antenna Systems, Avant, USA
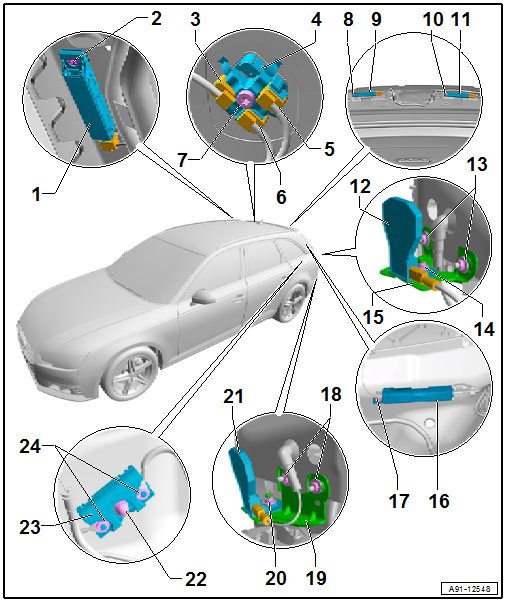
1 - Not Installed
2 - Not Installed
3 - SAT Connection for the Satellite Antenna -R170-
4 - Roof Antenna -R216-
- Removing and Installing. Refer to → Chapter "Roof Antenna, Removing and Installing".
5 - GPS Connection from GPS Antenna -R50-
6 - GSM Connection from Telephone Antenna -R65-
LTE Connection from LTE Antenna 2 -R306-
7 - Bolt
- 5 Nm
8 - Bolt
- 2 Nm
9 - Antenna Amplifier 2 -R111-
- Removing and Installing. Refer to → Chapter "Antenna Amplifier 2 -R111-, Removing and Installing, Avant".
10 - Bolt
- 2 Nm
11 - Antenna Amplifier -R24-
- Removing and Installing. Refer to → Chapter "Antenna Amplifier -R24-, Removing and Installing, Avant".
12 - LTE Antenna 2 -R306-
- Removing and Installing. Refer to → Chapter "Bumper Antennas, Removing and Installing".
13 - Nut
- 3 Nm
- Quantity: 2
14 - Nut
- 3 Nm
15 - Bracket
16 - TV Antenna Amplifier 1 -R82-
- Removing and Installing. Refer to → Chapter "TV Antenna Amplifier 1 -R82-, Removing and Installing, Avant".
17 - Bolt
- 2 Nm
18 - Nut
- 3 Nm
- Quantity: 2
19 - Bracket
20 - Nut
- 3 Nm
21 - LTE Antenna 1 -R297-
- Removing and Installing. Refer to → Chapter "Bumper Antennas, Removing and Installing".
22 - Nut
- 9 Nm
23 - Windshield Antenna Suppression Filter -C18-
- Removing and Installing. Refer to → Chapter "Windshield Antenna Suppression Filter -C18-, Removing and Installing, Avant".
24 - Nut
- 9 Nm
- Quantity: 2
READ NEXT:
 Antenna Amplifier, Removing and Installing
Antenna Amplifier -R24-, Removing and Installing, Sedan
The Antenna Amplifier -R24- is located on the upper right of
the D-pillar.
Removing
- Turn off the ignition and all electrical equipment a
TV Antenna Amplifier 1 -R82-, Removing and Installing, Sedan
The TV Antenna Amplifier 1 -R82- is located at the lower
right of the D-pillar.
Removing
- Turn off the ignition and all electrical equipment and
remove the ignition key.
- Remove the D-pi
Windshield Antenna Suppression Filter -C18-, Removing and Installing
Windshield Antenna Suppression Filter -C18-, Removing and Installing,
Sedan
The Windshield Antenna Suppression Filter -C18- is located
behind the left D-pillar trim panel at the center of the
D-pil
SEE MORE:
Personalization
Users
General information
Applies to: vehicles with personalized user settings
Depending on vehicle equipment and your country,
your vehicle may be able to manage various
users in the MMI. Each user will be assigned the
settings that they last used.
Before you begin driving, you can select a user i
Audi pre sense
Function overview
Applies to: vehicles with Audi pre sense
Within the limits of the system, the Audi pre
sense functions can initiate measures in certain
driving situations to protect the vehicle occupants
and other road users. Depending on the vehicle
equipment, various Audi pre sense systems
may b
