Audi A4: General Information - Multifunction Steering Wheel
The button is integrated in the steering wheel for easier operation of infotainment, telephone and the navigation system. On Tiptronic, rocker switches are also installed on the left and right.
The Multifunction Steering Wheel Control Module -J453- (in the right button) reads out the information and transfers them over the LIN Bus to the Steering Column Electronics Control Module -J527-. From the Steering Column Electronics Control Module -J527-, the information is transferred to the individual components via the CAN Bus (comfort) and the Data Bus On Board Diagnostic Interface -J533-.
Fault finding is performed using the "Guided Fault Finding" on the Vehicle Diagnostic Tester.
Overview - Multifunction Steering Wheel
Overview - Multifunction Steering Wheel, Steering Wheel with Round Airbag
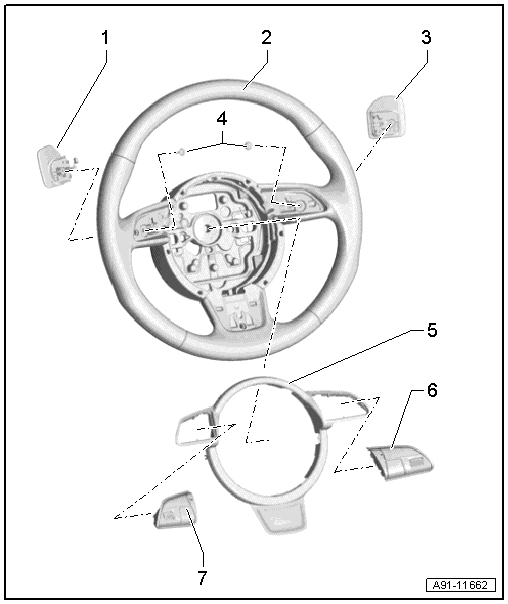
1 - Tiptronic Downshift Button on Steering Wheel -E439-
- Removing and installing. Refer to → Chapter "Tiptronic Downshift and Upshift Button on Steering Wheel -E439-/-E438-, Removing and Installing".
2 - 3-Spoke Steering Wheel
3 - Tiptronic Upshift Button on Steering Wheel -E438-
- Removing and installing. Refer to → Chapter "Tiptronic Downshift and Upshift Button on Steering Wheel -E439-/-E438-, Removing and Installing".
4 - Bolt
- 1 Nm
5 - Decorative Trim
6 - Right Multifunction Buttons on Steering Wheel -E441-
- Removing and installing. Refer to → Chapter "Right and Left Multifunction Buttons on Steering Wheel -E441-/-E440-, Removing and Installing, Steering Wheel with Round Airbag".
7 - Left Multifunction Buttons on Steering Wheel -E440-
- Removing and installing. Refer to → Chapter "Right and Left Multifunction Buttons on Steering Wheel -E441-/-E440-, Removing and Installing, Steering Wheel with Round Airbag".
Overview - Multifunction Steering Wheel, Steering Wheel with Trapezoidal Airbag
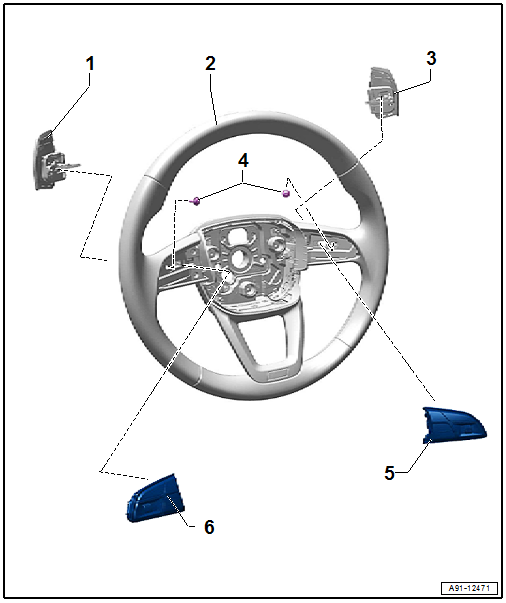
1 - Tiptronic Downshift Button on Steering Wheel -E439-
- Removing and installing. Refer to → Chapter "Tiptronic Downshift and Upshift Button on Steering Wheel -E439-/-E438-, Removing and Installing".
2 - 3-Spoke Steering Wheel
3 - Tiptronic Upshift Button on Steering Wheel -E438-
- Removing and installing. Refer to → Chapter "Tiptronic Downshift and Upshift Button on Steering Wheel -E439-/-E438-, Removing and Installing".
4 - Bolt
- 1 Nm
5 - Right Multifunction Buttons on Steering Wheel -E441-
- Removing and installing. Refer to → Chapter "Right and Left Multifunction Buttons on Steering Wheel -E441-/-E440-, Removing and Installing, Steering Wheel with Trapezoidal Airbag".
6 - Left Multifunction Buttons on Steering Wheel -E440-
- Removing and installing. Refer to → Chapter "Right and Left Multifunction Buttons on Steering Wheel -E441-/-E440-, Removing and Installing, Steering Wheel with Trapezoidal Airbag".
READ NEXT:
 Right and Left Multifunction Buttons on Steering Wheel -E441-/-E440-,
Removing and Installing
Right and Left Multifunction Buttons on Steering Wheel -E441-/-E440-,
Removing and Installing
Right and Left Multifunction Buttons on Steering Wheel -E441-/-E440-,
Removing and Installing, Steering Wheel with Round Airbag
Special tools and workshop equipment required
Trim Removal Wedge -340
Connection for External Multimedia Devices
Overview - Connection for External Multimedia Devices
There are several External Audio Source Connection -R199-
versions:
USB Charging - AUX IN, UE4
AMI (Audi music interface) - USB connection (qu
Rear Seat Entertainment System (RSE)
Overview - Rear Seat Entertainment System
The Rear Seat Entertainment System (RSE, 9WF) consists of:
Left Rear Information Display Control Head Control Module
-J648-/Right Rear Information Display
SEE MORE:
Noise Insulation
Overview - Noise Insulation
1 -
Quick Release
Without fastener
2 -
Plug/Rubber Grommet
Plug for vehicles without parking heater
Rubber grommet for parking heater exhaust pipe
3 -
Bolt
12 Nm
Quantity: 2
4 -
Rear Noise Insulation
Removing and install
Wiring Harness and Connector Repairs
Vehicle Electrical System, General Repair Information
Caution
When disconnecting and connecting battery, the
procedure must be followed as described in the Repair
Manual.
WARNING
Some tools are supplied with a tool safety clip,
which is slid over the tool points after using the
