Audi A4: Overview - Steering Column
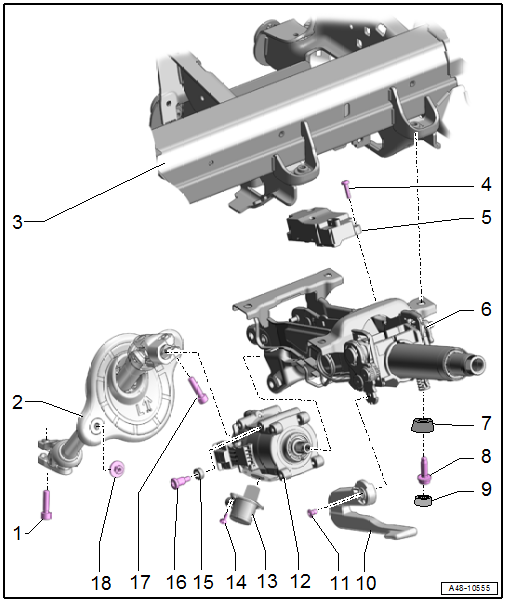
1 - Bolt
- 20 Nm + 90º
- Replace after removing
- Clean the threaded hole, for example, using a thread tap, before installing the new bolt.
- Install the bolt first by hand in the first threads. Check if the steering intermediate shaft is seated correctly by pulling. Then tighten the bolt.
2 - Steering Intermediate Shaft
- Removing and installing. Refer to → Chapter "Steering Intermediate Shaft, Removing and Installing".
3 - Instrument Panel Central Tube
4 - Bolt
- 4.5 Nm
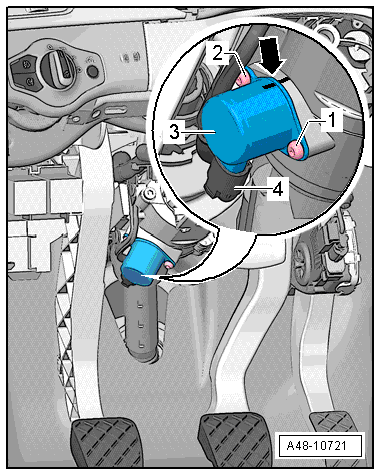
5 - Electronic Steering Column Lock Control Module -J764-
- Removing and installing. Refer to → Chapter "Electronic Steering Column Lock Control Module -J764-, Removing and Installing".
6 - Steering Column
- There are different versions. Refer to the Parts Catalog for the allocation.
- Removing and installing. Refer to → Chapter "Steering Column, Removing and Installing".
- Check for damage. Refer to → Chapter "Steering Column, Checking for Damage".
- Disconnect from the active steering actuator. Refer to → Chapter "Steering Column, Disconnecting from Active Steering Actuator"
7 - Anti-Theft Protection Component Lower Section
- Equipment version with manual transmission
8 - Bolt
- Quantity: 4
- Tightening specification and sequence. Refer to → Fig. "Steering Column - Tightening Specification and Sequence".
9 - Anti-Theft Protection Component Upper Section
- Equipment version with manual transmission
10 - Handle
- for the steering column adjustment
11 - Bolt
- 5 Nm
12 - Active Steering Actuator
- Disconnecting the steering column from the active steering actuator. Refer to → Chapter "Steering Column, Disconnecting from Active Steering Actuator"
13 - Active Steering Safety Lock Actuator -F437-
- Removing and installing. Refer to → Chapter "Active Steering Safety Lock (Locking Solenoid), Removing and Installing"
14 - Bolt
- Tightening specification and sequence. Refer to → Fig. "Active Steering Safety Lock (locking solenoid) - Tightening Specification and Sequence".
15 - Damper
- Replace after removing
16 - Pin
- Replace after removing
- Tightening specification and sequence. Refer to → Fig. "Steering Column and Active Steering Actuator - Tightening Specification and Sequence".
17 - Bolt
- 20 Nm + 90º
- Replace after removing
- Clean the threaded hole (for example, using a thread tap) before installing the new bolt.
- Install the bolt first by hand in the first threads. Check the if the steering intermediate shaft is seated correctly by pulling. Then tighten the bolt.
18 - Nut
- 4.5 Nm
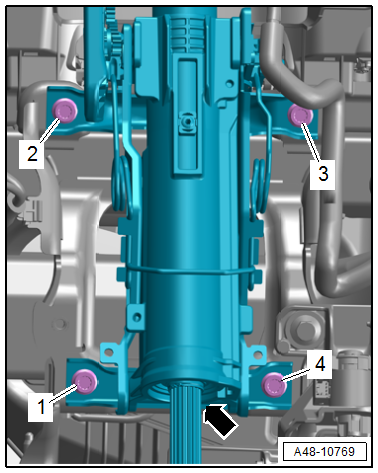
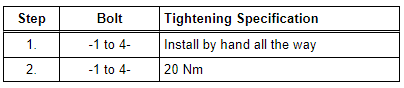
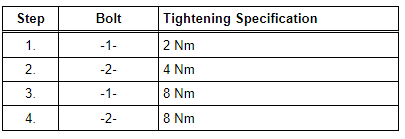
Steering Column - Tightening Specification and Sequence
- Tighten the bolts in the steps shown in the sequence:
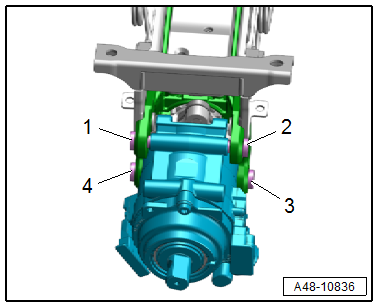
Steering Column and Active Steering Actuator - Tightening Specification and Sequence
- Tighten the pins to 9 Nm in the sequence -1 to 4-.
Active Steering Safety Lock (locking solenoid) - Tightening Specification and Sequence
- Tighten the bolts in steps:
READ NEXT:
 Steering Column, Checking for Damage
Visual Check
Components of the steering column must not show any
indications of damage.
Function Test
The steering column must turn without catching or difficulty
of movement.
The steering col
Active Steering Safety Lock (Locking Solenoid), Removing and Installing
Special tools and workshop equipment required
Vehicle Diagnostic Tester
Torque Wrench 1783 - 2-10Nm -VAG1783-
Removing
Note
To avoid a crooked steering wheel, the steering wheel must
no
Electronic Steering Column Lock Control Module -J764-, Removing and
Installing
Special tools and workshop equipment required
Torque Wrench 1783 - 2-10Nm -VAG1783-
Removing
- Remove the steering column from the instrument panel central
tube and place in the driver footwe
SEE MORE:
Status display
Fig. 16 Center display: frequently used symbols in the status
bar
The symbols in the status bar show you information
at a glance, such as ifa mobile device is connected
or if there is a data connection. The most
common symbols are listed in the table.
There is a data connection. The bar indicates
Driver/Front Passenger Seat Adjustment Control Head -E470-/-E471-,
Removing and Installing
Special tools and workshop equipment required
Trim Removal Wedge -3409-
Removing
- Carefully pry the actuators -1 and 2-
from the retainer using the -3409-.
- Remove the seat side trim on the side sill side. Refer to
→ Chapter "Seat Side Trim on Side Sill Side, Removing and
Ins
