Audi A4: Overview - Wheel Bearing
Audi A4 (B9) 2016-2026 Service Manual / Chassis / Rear Suspension / Wheel Bearing and Trailing Arm / Overview - Wheel Bearing
Overview - Wheel Bearing, FWD
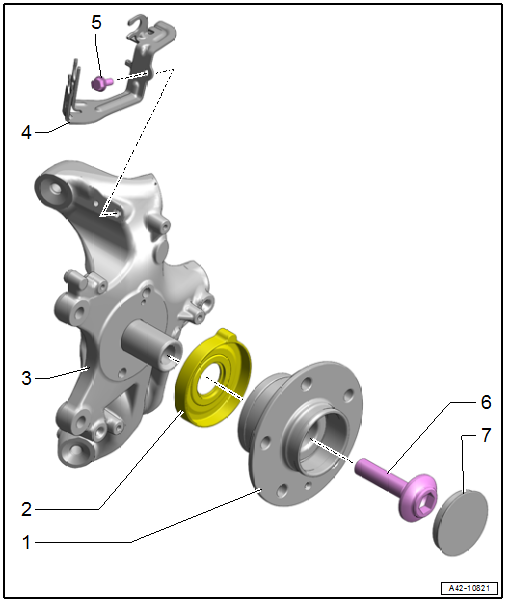
1 - Wheel Bearing Unit
- Removing and installing. Refer to → Chapter "Wheel Bearing Unit, Removing and Installing, FWD".
- Handling the wheel bearing. Refer to → Fig. "Wheel Bearing, Handling".
2 - Front Seal
3 - Wheel Bearing Housing
- Removing and installing. Refer to → Chapter "Wheel Bearing Housing, Removing and Installing".
4 - Bracket
- For wires
5 - Bolt
- 8 Nm
- Thread forming
- Position the bolt by hand and tighten it until it finds the old threads. Then tighten the bolt to the specification.
6 - Bolt
- 200 Nm + 180º
7 - Dust Cap
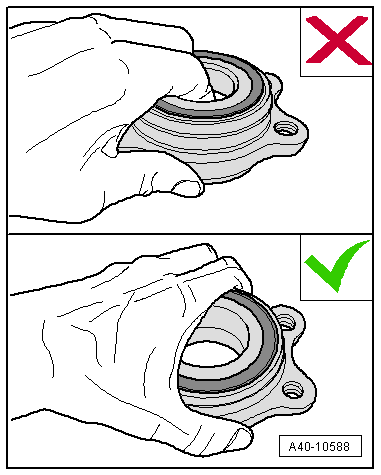
Wheel Bearing, Handling
 Caution
There is a risk of contaminating and damaging the seal.
- The wheel bearing -1- must face up in order to remove the wheel bearing unit.
- Always set the wheel bearing unit down on the wheel hub -2-.
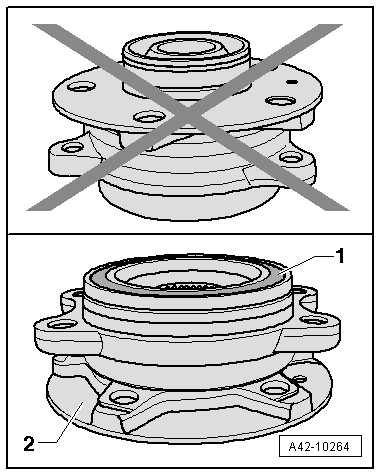
- Never reach inside when lifting the wheel bearing.
- Hold the wheel bearing only on the outside.
Overview - Wheel Bearing, AWD
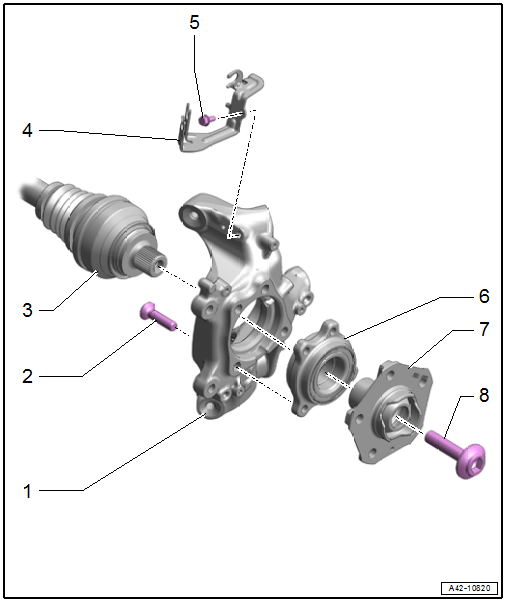
1 - Wheel Bearing Housing
- Removing and installing. Refer to → Chapter "Wheel Bearing Housing, Removing and Installing".
2 - Bolt
- 80 Nm + 90º
- Replace after removing
3 - Drive Axle
4 - Bracket
- For wires
5 - Bolt
- 13 Nm
- Thread forming
- Position the bolt by hand and tighten it until it finds the old threads. Then tighten the bolt to the specification.
6 - Wheel Bearing
- Wheel bearing unit, removing and installing. Refer to → Chapter "Wheel Bearing Unit, Removing and Installing".
- Currently only delivered with -7-
- Wheel bearing unit, servicing. Refer to → Chapter "Wheel Bearing Unit, Servicing".
- Handling the wheel bearing. Refer to → Fig. "Wheel Bearing, Handling".
7 - Wheel Hub
- Currently only delivered with -6-
8 - Bolt
- Drive axle threaded connection, loosening and tightening. Refer to → Chapter "Drive Axle Threaded Connection, Loosening and Tightening".
READ NEXT:
 Wheel Bearing Housing, Removing and Installing
Special tools and workshop equipment required
Torque Wrench 1332 40-200Nm -VAG1332-
Engine and Gearbox Jack -VAS6931-
Engine/Gearbox Jack Adapter - Wheel Hub Support -T10149-
Caution
Thi
Wheel Bearing Unit, Removing and Installing
Wheel Bearing Unit, Removing and Installing, FWD
Special tools and workshop equipment required
Puller - Grease Cap -VW637/2-
Camshaft Installer Kit - Sleeve -3241/4- from the Seal
Installer - Cams
Wheel Bearing Unit, Servicing
Note
The wheel bearing and wheel hub are currently only delivered
together. As soon as these components are delivered separately,
the following instructions will apply.
Special tools and wor
SEE MORE:
Rear Bumper Cover Mount, Removing and Installing
Bumper Cover Mount, Removing and Installing, Upper
Removing
- Remove the rear bumper cover. Refer to
→ Chapter "Bumper Cover, Removing and Installing".
- Remove the bolts -arrows-.
- Remove the upper mount -1-.
Installing
Install in reverse order of removal.
Tightening Speci
Airbag Adapter, Connecting and Disconnecting
Special tools and workshop equipment required
Airbag Lockout Adapter -VAS6282-
Airbag Connector, Disconnecting
- Move the front seat all the way to the rear and then into its
highest position.
- Fold up the cover in the carpet.
WARNING
Risk of injury due to involuntary deploy
© 2019-2026 Copyright www.audia4b9.com
