Audi A4: Steering Wheel
Overview - Steering Wheel
Overview - Steering Wheel, Three-Spoke Steering Wheel
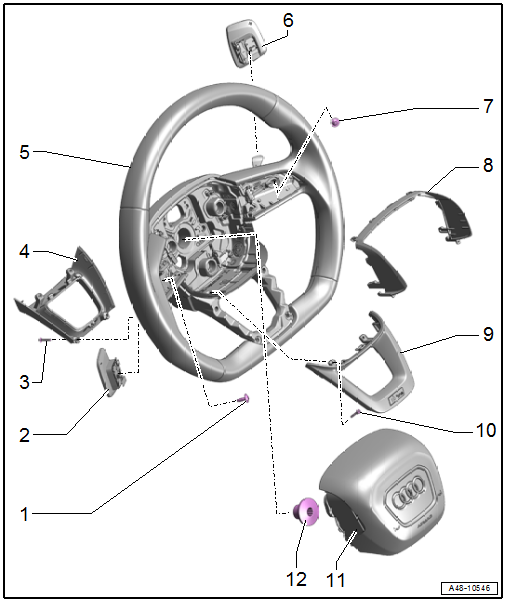
1 - Bolt
- Tightening specification. Refer to → Communication; Rep. Gr.91; Multifunction Steering Wheel; Overview - Multifunction Steering Wheel.
2 - Tiptronic Downshift Button -E480-
- Overview. Refer to → Communication; Rep. Gr.91; Multifunction Steering Wheel; Overview - Multifunction Steering Wheel.
3 - Bolt
- 1.2 Nm
4 - Rear Trim
- For the steering wheel
5 - Three-Spoke Steering Wheel
- Removing and installing. Refer to → Chapter "Steering Wheel, Removing and Installing".
6 - Tiptronic Upshift Button -E479-
- Overview. Refer to → Communication; Rep. Gr.91; Multifunction Steering Wheel; Overview - Multifunction Steering Wheel.
7 - Bolt
- Tightening specification. Refer to → Communication; Rep. Gr.91; Multifunction Steering Wheel; Overview - Multifunction Steering Wheel.
8 - Upper Trim
- For the steering wheel
9 - Lower Trim
- For the steering wheel
10 - Bolt
- 1.2 Nm
11 - Driver Side Airbag
 WARNING
Pyrotechnic components increase the risk of injury.
Follow all safety precautions when working on the airbags. Refer to → Body Interior; Rep. Gr.00; Safety Precautions; Safety Precautions when Working on Pyrotechnic Components.
- Removing and installing. Refer to → Body Interior; Rep. Gr.69; Driver Side Airbag; Driver Side Airbag Unit with Igniter, Removing and Installing.
12 - Bolt
- 30 Nm + 90º
- Replace after removing
Overview - Steering Wheel, Four-Spoke Steering Wheel
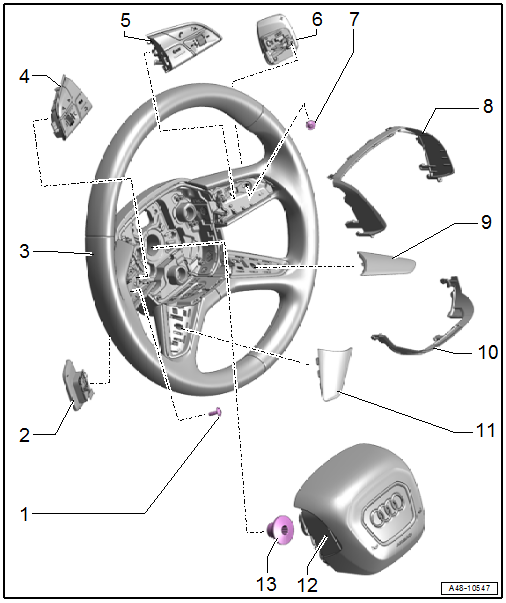
1 - Bolt
- Tightening specification. Refer to → Communication; Rep. Gr.91; Multifunction Steering Wheel; Overview - Multifunction Steering Wheel.
2 - Tiptronic Downshift Button -E480-
- Overview. Refer to → Communication; Rep. Gr.91; Multifunction Steering Wheel; Overview - Multifunction Steering Wheel.
3 - Four-Spoke Steering Wheel
- Removing and installing. Refer to → Chapter "Steering Wheel, Removing and Installing".
4 - Left Multifunction Buttons on Steering Wheel -E440-
- Overview. Refer to → Communication; Rep. Gr.91; Multifunction Steering Wheel; Overview - Multifunction Steering Wheel.
5 - Right Multifunction Buttons on Steering Wheel -E441-
- Overview. Refer to → Communication; Rep. Gr.91; Multifunction Steering Wheel; Overview - Multifunction Steering Wheel.
6 - Tiptronic Upshift Button -E479-
- Overview. Refer to → Communication; Rep. Gr.91; Multifunction Steering Wheel; Overview - Multifunction Steering Wheel.
7 - Bolt
- Tightening specification. Refer to → Communication; Rep. Gr.91; Multifunction Steering Wheel; Overview - Multifunction Steering Wheel.
8 - Upper Trim
- For the steering wheel
9 - Trim
- For the steering wheel spoke
10 - Lower Trim
- For the steering wheel
11 - Trim
- For the steering wheel spoke
12 - Driver Side Airbag
WARNING
Pyrotechnic components increase the risk of injury.
Follow all safety precautions when working on the airbags. Refer to → Body Interior; Rep. Gr.00; Safety Precautions; Safety Precautions when Working on Pyrotechnic Components.
- Removing and installing. Refer to → Body Interior; Rep. Gr.69; Driver Side Airbag; Driver Side Airbag Unit with Igniter, Removing and Installing.
13 - Bolt
- 30 Nm + 90º
- Replace after removing
Steering Wheel, Removing and Installing
Special tools and workshop equipment required
- Torque Wrench 1331 5-50Nm -VAG1331-
- Steering Wheel Scales -VAS6458-
 Caution
This procedure contains mandatory replaceable parts. Refer to component overview and parts catalog prior to starting procedure.
Mandatory Replacement Parts
- Bolt - Steering wheel to Steering Column
Removing
- Bring wheels in the straight position.
- Move the steering wheel as far to the rear and down as possible. Use the full steering column adjustment range for this.
- Switch off the ignition.
- Remove the airbag unit. Refer to → Body Interior; Rep. Gr.69; Driver Side Airbag; Airbag Unit with Igniter, Removing and Installing.
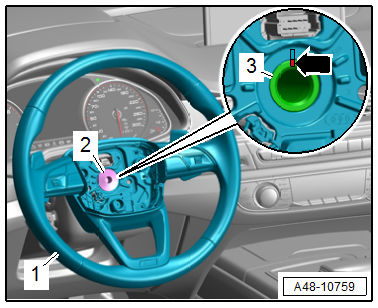
- Remove the bolt -2-.
- For reinstallation, mark the steering wheel installation position -1- to the steering column -3--arrow-.
- Remove the steering wheel from the steering column.
Installing
Install in reverse order of removal and note the following:
- Front wheels in straight position.
- Note the marks on the steering column/steering wheel when reusing.
- Install the airbag unit. Refer to → Body Interior; Rep. Gr.69; Driver Side Airbag; Airbag Unit with Igniter, Removing and Installing.
- Perform a road test.
- If the steering wheel is crooked, it must be removed again and reset on the steering column splines.
- Readapting the end position of the steering gear. Refer to → Chapter "Steering Gear End Positions, Adapting".
Tightening Specifications
- Refer to → Chapter "Overview - Steering Wheel"
READ NEXT:
 Overview - Steering Column
1 - Bolt
20 Nm + 90º
Replace after removing
Clean the threaded hole, for example, using a thread tap, before
installing the new bolt.
Install the bolt first by hand in the first thre
Steering Column, Checking for Damage
Visual Check
Components of the steering column must not show any
indications of damage.
Function Test
The steering column must turn without catching or difficulty
of movement.
The steering col
SEE MORE:
Rear Seat Entertainment System (RSE)
Overview - Rear Seat Entertainment System
The Rear Seat Entertainment System (RSE, 9WF) consists of:
Left Rear Information Display Control Head Control Module
-J648-/Right Rear Information Display Control Head Control
Module -J649- on the left/right front seat backrest frame
Information Electro
Underbody Trim Panels, Removing and Installing
Underbody Trim Panel, Removing and Installing, Front
Removing
- Remove the nuts -arrows-.
- Remove the front underbody trim panel -2-
from the center underbody trim panel -1-.
Installing
Install in reverse order of removal.
Tightening Specifications
Refer to
→ Chapter "Overview
