Audi A4: Suspension Strut, Removing and Installing
- Torque Wrench 1331 5-50Nm -VAG1331-
Removing
- Remove the shock absorber fork. Refer to → Chapter "Shock Absorber Fork, Removing and Installing".
- Remove the tower brace. Refer to → Chapter "Tower Brace, Removing and Installing".
Equipment Versions with Electronic Damping
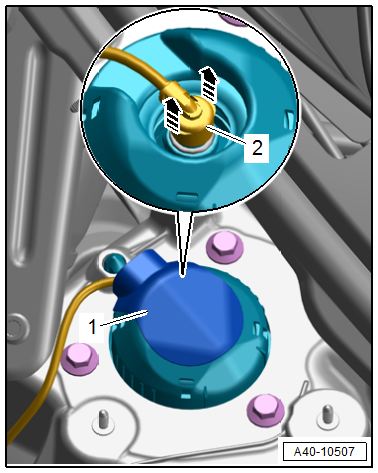
- Remove the cover -1-.
- Disconnect the connector by releasing the locking ring -2- upward -arrows-, and remove the connector.
Continuation for All Vehicles
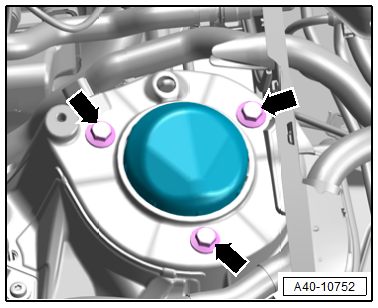
- Remove the bolts -arrows-, and remove the suspension strut. Do not damage the CV boots on the steering, the drive axle as well as the boot.
Installing
Install in reverse order of removal and note the following:
- Installation position. Refer to → Fig. "Suspension Strut Coil Spring Installation Position".
After replacing the struts:
- Adjust the headlamps. Refer to → Electrical Equipment; Rep. Gr.94; Headlamps; Headlamps, Adjusting.
- Driver assistance systems front camera, calibrating. Refer to → Chapter "Driver Assistance Systems Front Camera, Calibrating".
Tightening Specifications
- Refer to → Chapter "Overview - Suspension Strut and Upper Control Arm"
- Refer to → Chapter "Overview - Lower Control Arm and Ball Joint"
Suspension Strut, Servicing
Special tools and workshop equipment required
- Torque Wrench 1332 40-200Nm -VAG1332-
- Spring Compressor Kit -VAG1752-
- Spring Compressor Kit - Spring Tensioner -VAG1752/1-
- Spring Compressor Kit - Spring Retainer w/Inserts -VAG1752/6-
- Shock Absorber Set -T10001-
- Shock Absorber Set - Socket -T10001/3-
- Shock Absorber Set - Extension SW6 -T10001/7-
- Shock Absorber Set - Reversible Ratchet -T10001/11-
 Caution
This procedure contains mandatory replaceable parts. Refer to component overview and parts catalog prior to starting procedure.
Mandatory Replacement Parts
- Nut - Strut Mount to Shock Absorber
 Note
Note
Because of different shock absorber valve systems, only install new shock absorbers from the same manufacturer on both axles, if possible.
Remove the Coil Spring
- Suspension strut is removed. Refer to → Chapter "Suspension Strut, Removing and Installing".
- Tension the -VAG1752/1--1- in a vise with jaw protectors.
 WARNING
Risk of accident!
Make sure that the coil spring is seated correctly -arrow- in the -VAG1752/6-.
1 - -VAG1752/1-
2 - -VAG1752/6-
- Arrange the special tools as shown:
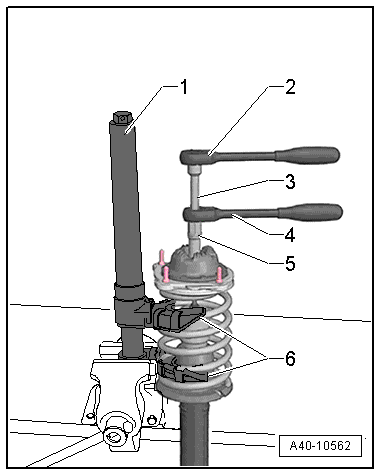
1 - -VAG1752/1-
2 - Ratchet (commercially available)
3 - -T10001/7-
4 - -T10001/11-
5 - -T10001/3-
6 - -VAG1752/6-
- Pretension the coil spring in the spring tensioner, until the upper spring plate and the spring support are disengaged.
- Pull off the cover.
- Remove the nut from the piston rod.
- Remove the individual components of the suspension strut and coil spring using the spring tensioner.
Shock Absorber, Replacing
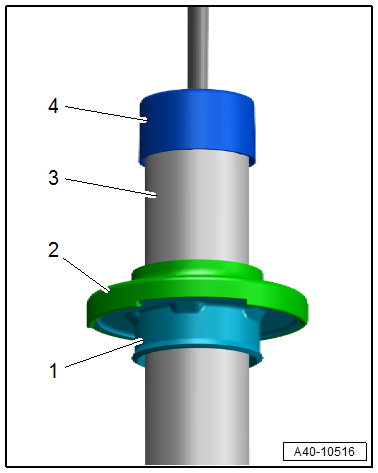
- Remove the cap -4- and the lower spring support -2-.
- Loosen the spring plate -1- using a plastic mallet and remove upward from the shock absorber -3-.
Coil Spring, Installing
- Tap the spring plate -1- onto the new shock absorber -4- using a plastic mallet.
- Position the lower spring support -2- and the cap -4-.
- Position the pretensioned coil spring on the lower spring support.
- Position the individual suspension strut components.
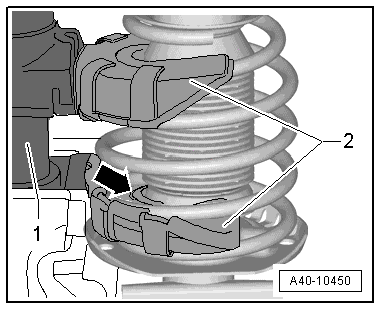
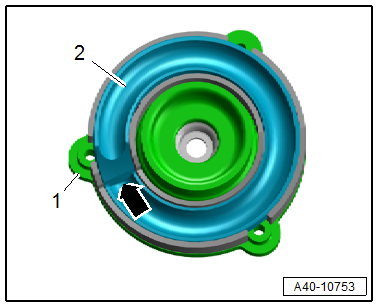
- Position the strut mount -1- with the spring support -2- on the pretensioned spring so that the spring support rests against the end of the coil spring -arrow-.
- Permitted maximum play: 2 mm.
- Release the tension on the -VAG1752/1-
Note
When releasing the tension, make sure the upper end of the spring rests on the spring support stop.
Tightening Specifications
- Refer to → Chapter "Overview - Suspension Strut Coil Spring"
READ NEXT:
 Upper Control Arm, Removing and Installing
Special tools and workshop equipment required
Vehicle Diagnostic Tester
Torque Wrench 1331 5-50Nm -VAG1331-
Torque Wrench 1331 Insert - Ring Wrench - 16mm -VAG1331/12-,
not illustrated
Torque Wr
Shock Absorber Fork, Removing and Installing
Special tools and workshop equipment required
Spreader Tool -3424-
Torque Wrench 1331 5-50Nm -VAG1331-
Torque Wrench 1332 40-200Nm -VAG1332-
Caution
This procedure contains mandatory rep
SEE MORE:
Battery Charger -VAS5906-
WARNING
Risk of injury. Follow all warning messages and
safety precautions. Refer to
→ Chapter "Warnings and Safety Precautions".
WARNING
Do not check or charge a Battery -A- when the visual
indicator has "no color or is
bright yellow". Jump starting must not be used!
Th
Underbody Trim Panel
Overview - Underbody Trim Panels
1 -
Nut
2 Nm
Quantity: 2
2 -
Front Underbody Panel
Removing and installing. Refer to
→ Chapter "Underbody Trim Panel, Removing and Installing, Front".
3 -
Impact Protector
4 -
Bolt
2 Nm
5 -
Center
